Saturday, August 10, 2013

August Paper Crafters Sampler

It's that time again - the new Paper Crafters Sampler release day! The theme this month is Prelude to Fall.


I had a lot of fun creating my 3D project for this month. Here's a sneak peek for you!


I promise you will love this month's projects, so I hope you will subscribe and join in the fun!

Wednesday, July 10, 2013

Exciting news!

Today is the day I get to share my news with you... I've been asked to join the design team for the Paper Crafters Sampler. If you haven't seen PCS before, on the 10th of the month you can get a new selection of SUO projects with instructions (including 3D templates) designed by super-talented SU demonstrators. I can tell you the projects are fabulous - the theme for this month is Sand and Sea.


Here is a sneak peek of my beachy card - you can see the whole card, along with the rest of the projects, once you've purchased the July sampler. All of the DT members are giving sneak peeks today, so check out their blogs for more of a taste of what you will get.


I hope you'll check it out - I'm really excited to be part of this team!

Monday, July 1, 2013

Stampin' Up! News for July

Hi y'all! I do have some exciting news for myself, but it's a few more days until I can let you in on the secret. I've been busy working on this new project, as well as spending time with family, so I haven't been able to play any challenges recently. Hopefully soon!

In the meantime, Stampin' Up! announced several news items for July:

(1) Designer paper is buy three get one free! I love this special and I'm so happy to see it back this year.

(2) The new "Best Of" stamp set this month is called Best of Shelli - Shelli Gardner, our fabulous CEO, selected these images herself!

(3) There is a new clear (photopolymer) stamp set available called Settin' Sail. It's super cute with trendy banners and a hexagon to go with our new punch. Item number 133453 - I'm not seeing a flyer up yet but here is what they look like:


If you want to order any of these items, or anything else, don't forget I have a mystery hostess promo going on now. See this post for more info. Hope everyone has a great week and a happy Fourth of July!

Saturday, June 29, 2013

Mystery hostess time!

I'm offering a hostess code for online orders through July 15. Here's all you have to do:

Shop online (with me as your demonstrator) and enter the hostess code SSGZJBQ6 in the appropriate box. Your order can be any amount - and don't forget to check the clearance rack for the new items that were added this week!

If orders placed with the code reach $150, I will pick one customer from the orders placed to win $25 in hostess dollars! I will choose the winner on July 16.

Happy shopping!

What to Washi class and bundle

Our next online class--What to Washi--is now available. Offering seven different sections of Washi wisdom, this class includes everything you need to know to make the most of one of the hottest crafting trends out there. Originating in Japan, Washi Tape has taken the crafting world by storm, offering an incredibly quick, easy way to add a fresh, colorful look to any project. What to Washi explores a myriad of Washi options and provides much more than the basics for you to begin your own Washi adventures.  Divided into seven PDF documents, this class includes written instructions, step-out photos, instructional videos, and supply lists for more than 30 projects.  

The following topics are covered in the class:
  • The Washi Basics
  • Washi--The Next Step
  • Above and Beyond
  • Sharing Washi with Others
  • Memory Keeping
  • Storage
  • Only the Beginning . . .
What to Washi Class:  item 134742
Price:  $14.95
 
And wait, there's more! This class is also being offered as part of the What to Washi Bundle. When you order the bundle you receive everything listed below:
  • What to Washi Class
  • Epic Day This and That Designer Washi Tape
  • Gingham Garden Designer Washi Tape
  • Season of Style Designer Washi Tape
  • Witches Brew Designer Washi Tape
  • 20 Whisper White Note Cards & Envelopes
Each Washi Tape package contains three coordinating rolls of Stampin' Up!'s exclusive Washi Tape for a total of 12 rolls. And when you order the What to Washi Bundle, you'll be the first to receive our Season of Style and Witches Brew Washi Tape packages; they aren't available to individual purchase until August 1! 

What to Washi Bundle:  item 134743
Price:  $36.95

PC Instructions
The files will be downloaded as archive files that you can then extract and save on your computer. When you click on the download link, an extraction program will automatically launch. Choose the location where you would like to save the files (be sure to note where you save them). Follow the prompts on the extraction program, then navigate to the location where you saved the files. Click on the file and open.
Mac Instructions
When you click on the download link, the file will be mounted as a drive. Once it is mounted, open the drive and drag and drop the files to the location of your choice on your hard drive. The files can then be opened.

Thursday, June 13, 2013

Hello, Dahlia

Hello again! I have card #2 for you. I have always wanted to play along with the Play Date Cafe but hadn't had a chance until today. The idea of black and white with a splash of apricot really intrigued me as a challenge. I decided Crisp Cantaloupe was close enough and went with that color. Such a clean and modern color scheme seemed to pair really well for the new challenge at CAS(E) This Sketch. I'm also considering this a one-layer card (in my mind, dimensionals are required and don't count!) for the Ways to Use It challenge on Splitcoaststampers.


Here is my card featuring the new stamp set called Regarding Dahlias:


This is something very different for me and I'm really pleased with the result. On the white card layer I used the Simply Scored borders plate to emboss the left side, then I stamped the flower and sentiment in Basic Black. Stamping the flower again in cantaloupe on a scrap allowed me to cut out and pop up the center for the splash of color. I felt like the color needed to come in somewhere else, though, so I colored some pearls with a Sharpie and added them as accents to the scalloped border.

I have to say, I have had so much fun this week. It's been such a treat to spend so much time creating. This will probably be the end of my stamping for a few days, but I will be back as soon as I can to keep the creations coming!

Wednesday, June 12, 2013

Quick tutorial: Layering with Framelits

I was working on some cards for my Etsy shop tonight and stumbled across something I thought was cool and wanted to share. I was using the window Framelits and wanted to layer my image, but the die the next size up was just too big - it didn't fit my 3" card and the border was just too wide for my taste. I started looking through my punches and dies to see if I had something else that would look good as a layer. Here is the final product - can you tell what I did? Here's a hint: we have a brand-new product that made this possible...


Did you guess? It all hinged on the new square Framelits. It happens that the set includes a die that gives a 2" square, and that was the perfect size for my 2.5" stamped image from the Best of Flowers set. Then I just needed some circles to finish it off.


Cutting the circles in half gives the perfect layer for each round side; just attach the square behind the label and then add the half circles. Pretty nifty, eh? This might also work for other sizes of labels/squares/circles - remember we also have the new circle Framelits so I'm sure there must be other sizes you could try.

But I have one other little thing to show you. I still had my 3" brown label that I'd cut earlier, so in the interest of using scraps, I cut my first square from the inside of that label. Look at the result:


I'm not sure what I'll do with this little piece, but it was too cute not to save for something! Now I'm very curious what other combinations of dies might create even more shapes. If you try this out, I hope you'll share. Happy crafting!

Tuesday, June 11, 2013

CAS, day 2

Last night my husband asked me if I had a Father's Day card I could send to his dad. I said I didn't, but of course I could make one! The challenges for today: CAS(E) this Sketch and Pink Elephant (Father's Day). Here is my card:


Clean and simple was the style of the day again today - my weekdays are usually jam packed. This new stamp set called Wetlands seemed perfect for the sketch and the occasion - my father-in-law spends a lot of working outside at his house by a small lake. I used generation stamping for the wheat background and stamped the goose twice so I could pop up the top layer. For colors I chose some masculine stand-bys: Early Espresso, Crumb Cake and Very Vanilla. The sentiment is retired, and I used the Stamp-a-ma-Jig to fit the three words inside the tag punch. I made the border between the stamped panel and the DP with thin strips of card stock that were left over from cutting. I added some linen thread to my tag and that was it! Thanks so much for stopping by!

Monday, June 10, 2013

Short and Sweet

Happy Monday! I decided to squeeze in time for a quick card today, and the Splitcoaststampers Clean and Simple challenge was the perfect thing. It's a color challenge this week: Melon Mambo, Pear Pizzazz, Crumb Cake and white. For me this is a small amount of colors, LOL. I also took a peek at the Mojo Monday sketch and decided I could make it work for CAS. It doesn't have a lot of white space, but I would call this card CAS because it doesn't have much layering and it came together really quickly. You could say it was the opposite of my card from Saturday!


I'm still having fun playing with all my new stuff. This card features one of the images from Flower Shop, along with the coordinating pansy punch. Just a heads-up: it can be tricky aligning this punch with the image since it's not symmetrical - but I kept turning my flower and eventually I got the right spot. It's definitely worth the effort - gorgeous stamp set and punch. I also used the new hostess set called Banner Greetings, the Gingham Garden DP (again), and the candy dots. These are perfect if you put your card together and realize that a corner needs a little something (ahem). Super cute and easy! The rest of the card uses Crumb Cake card stock with embossed dots, punched melon borders (one strip from the ribbon punch, cut in half), and retired pear DP - oh, and I made quick little leaves with the wing on the bird punch and embossed those with the houndstooth folder.

This is one of the things I love about stamping - I can spend a long time crafting something elaborately detailed, or I can quickly put together an adorable card that still packs a punch! (Pun intended!) I hope you'll pull out your supplies and stamp something today. Have a great week!

Saturday, June 8, 2013

My happy place

Twice in one weekend - crazy, right? I posted my card yesterday, even though I wasn't super happy with it - you spend enough time on something, you figure you'll just throw it out there anyway. But today I felt like I needed to boost my stamping confidence a little. I spent all afternoon on this card - never mind that one of my Copics blobbed all over the image when I was almost done coloring it, and I fussed a lot over just about every decision I made. It's been a long time since I devoted that much of my day to one single project, and looking at it now I feel happy.


There are three challenges at work here: Color Throwdown (I used Melon Mambo, Crisp Cantaloupe, Kiwi Kiss, and a mix of Daffodil Delight and Barely Banana), CAS-ual Fridays (banners) and Deconstructed Sketches. The featured stamp set is brand-new and called Backyard Basics - these stamps are gorgeous, and how great that we have dies to go with them. I did the large group of pink flowers and three tulips, then "tied" them into a bouquet with a bit of ribbon. Here are the Copic colors I used:


It's been a long time since I did much with Copics, but I had a blast using them (apart from the aforementioned blob incident). There are a bunch of products used here: Delicate Doilies sizzlit with DP from Birthday Basics, Window Frame framelit (I cobbled together my own piercing "template" since the one that goes with these framelits doesn't include the teeny tiny die), A Round Array stamp set for the sentiment, banners from Gingham Garden DP (pink and yellow) and one from my stash (green), and retired melon DP for the background.

My life is crazy right now, and I don't know what lies ahead - there could be some big changes for me in the coming months. For the time being I think I'm going to try to do more challenges and post more often, because like I said, it makes me happy. Thanks for visiting and enjoy the weekend!

Friday, June 7, 2013

Cute Zoo Babies

Oh my, I've been so busy lately - but yesterday my order of goodies from the new catalog arrived, and today I just had to crack something open and make a card just for fun. I don't even know when the last time was I did that. Is there seriously any better therapy? This one is for two challenges: colourQ and Create with Connie and Mary's sketch.


I loved the color combo the colourQ team came up with:


I substituted the new Smoky Slate and the recently returned Pear Pizzazz, plus I added Early Espresso just to give more depth. These colors seemed like great matches for the animals I chose from the new set called Zoo Babies. I don't know what it is - I'm not a big cutesy stamper, but I can't resist animal sets like this one! I tried my hand at cutting hexagons to go on the embossed banner - and I'm joining the ranks of people who are hoping we get a mini hexagon punch soon! The DPs are a mix of old and new patterns. The sentiment from Label Love seemed like the perfect choice, and I added one of the new neutrals buttons threaded with a tiny piece of the pear DP. Now all I need is someone to have a sweet baby boy so I can send this card out - I seem to be past the era of friends having babies, but I still love to make baby cards!


Tuesday, May 21, 2013

Happiness Always

I get the pleasure of going to three cousins' weddings this summer - and of course that means I get to make some wedding cards! It's not a category I need very often, so I'm looking forward to it. This weekend is the first of the three weddings, so here is my first card. I'm entering in a few challenges: Pals Paper Arts (sketch), Fusion Card Challenge (inspiration photo), Friday Mashup (monochromatic), and SUO Challenges (retiring stamp set: Happy Thoughts).


From the Fusion inspiration photo I took the flowers and dots, and the CAS look of the photo. I chose brown because it became clear to me, after looking at their registries, that the bride and groom love brown! This is Soft Suede with the naturals ivory card stock. I featured the Pleasant Poppies stamp and added some pearls and distressing. I layered the crochet trim and Soft Suede taffeta ribbon under the sentiment, which is so beautiful - I'm sad it's retiring because I didn't get to use it very often. All in all this card came together quite quickly - which is perfect since I didn't have a lot of time. But I hope my cousin and his future wife will love it!

Friday, May 3, 2013

Watercolor Polaroid

I promised to show you one of my club cards for this weekend. The inspiration for this card came from the fabulous Julie Ebersole - you will see a strong resemblance between her card and the focal point of mine. I added a couple elements with the dry embossed background and additional color for the card base. I'm entering in two challenges today: Friday Mashup (embossing) and CAS-ual Fridays (from their tic-tac-toe challenge I used kraft + bling + embossing).

 
This card started out by the faux Polaroid I found on Pinterest. However, the person who made that used Nestabilities and SU doesn't have anything that would work (yet.... hint, hint). So I went searching online for a tutorial and came across Julie's card. I fell in love with it right away - but for her faux Polaroid she used a punch, and ours isn't nearly big enough. What's a demo to do? Figure out how to make it myself! And now I get to share it with you. Here's how to do it:
 
1. Cut Whisper White card stock into a piece 3” x 3 3/8”.
2. Position card stock on paper trimmer with the short side at the top and the right edge aligned with the 1/4” mark to the right of the cutting area.
3. Using the arrow on the cutting blade, position the blade 1/4” from the top of the paper and cut until you reach 2 5/8”.
4. Turn the paper to continue cutting out the center, leaving 1/4” on each side.
The watercoloring on the punched heart follows Julie's technique. I mixed Pink Pirouette, Primrose Petals and Raspberry Ripple ink (about 3 drops from the reinkers) with about 5-6 drops of water in an artist's palette. I started with the lightest color at the top and worked my way down. Once the heart was dry I used the two-way glue pen and Dazzling Diamonds to add some sparkle. I got mini clothespins at the craft store (ahem) and clipped my heart to some twine, then attached it to my frame with 1/8" brads. The Crumb Cake background is simply embossed with the hexagon folder and adhered to a primrose card base; I put the paper into the embossing folder sideways to leave the bottom plain for the sentiment, which comes from Lovely Thoughts.
 
Ready to try it yourself? I know there are endless possibilities for using the Polaroid in cards and projects. If you make something I hope you'll share it with me!

Thursday, May 2, 2013

It's all about mom

Whew, it's been a while. My stamps have been feeling neglected! But this weekend I have my club so that always gets me stamping. I wanted to share our 3D project, which is a cute basket design I got from Renee Van Stralen a couple years ago. I believe Renee is no longer a demonstrator, but I loved her designs and decided to resurrect this project for a Mother's Day basket. Of course it could work for any occasion - and although this one is pretty small, you could also scale it up easily to make a larger basket.

I'm entering this in the Stampin' Royalty challenge posted yesterday, which is of course to make something for Mother's Day.


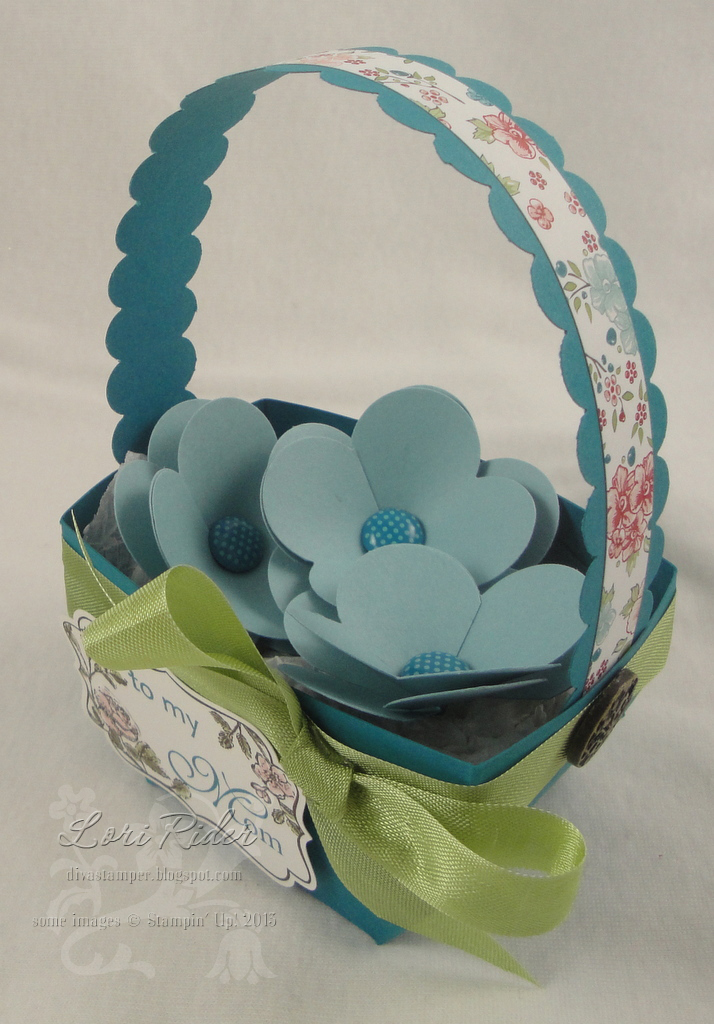
The basket is made with a 6 x 6 square of card stock, and here is Renee's diagram for how to score and cut it. You score it into a grid of nine 2" squares, then the corner squares each get cut into three 1" strips.


To assemble the basket, start with one triangle (point at the top) and glue the first cut strips to the front of the triangle. Then glue the next strips, alternating as you go to make a criss-cross pattern. The last pair of strips should make an even horizontal line across the top, then you may have to trim a bit of your triangle that is peeking out. The handle is 1" x 9" and attached to the sides with the large vintage brads.
 
 
Here's another shot of it. I took the colors from the Twitterpated DP: Island Indigo, Baja Breeze and Pear Pizazz. (So happy the pear is coming back!! But so sad Baja Breeze is going away!) I wanted some simple flowers to put in my basket, so I punched two flowers and cut toward the center on each petal. The two flowers are put together with a brad, and for the top flower I overlapped two petals so it has four instead of five. The label is from Four Frames, and I used Family Reunion to stamp "to my Mom" in indigo.
 
I have our two club cards to show you - I will post one of them soon. The other one will have to wait since the recipient reads my blog. ;) Thanks for visiting and have a great day!

Thursday, April 25, 2013

Retirement party!


I'm sure you've heard by now - the Stampin' Up! retirement lists are here! Click HERE for the list of retiring stamps and HERE for the accessories. Check the list - they update the items that are sold out (sniff!) and you'll want to get your favorites now!

How would you like to win $25 in hostess dollars? To get a chance to win, all you have to do is place an online order using my special hostess code. Here's how:

Go to my online shop HERE and fill your cart. You can order any amount to qualify. You do have to have an account to shop online.

At the bottom of the screen is a box to enter the hostess code, which is: E3E97XF4
Don't forget to enter the code! Only orders that use the code will be entered, and the order has to reach $150 in order to earn the benefits, so feel free to tell your friends!

The hostess code will close on May 7 and I will notify the winner on May 8.

If you don't win but you would like your very own hostess benefits, you can get your own code! It's like having an online workshop. You can share the code with anyone in the US and you get credit for the order. Please contact me at loririder (at) verizon (dot) net if you'd like to have a virtual party and earn hostess benefits for yourself!

OK, time to get shopping! Don't wait before that stamp set or color or paper you wanted is gone - for good!

Saturday, April 20, 2013

It's sad to say good-bye...

This post is a difficult one to write. After several years of being part of the team at Our Creative Corner I have decided it's time to step down. I will really miss this fabulous team - I can't quite believe it's been this long, but I joined in September 2009. WOW. Time goes by so fast!

The OCC will be undergoing some changes as our leader, Linda Coughlin, will be handing the reins over to a new artist. More details will be coming about that, but for now Linda asked us to repost a former project as a way of saying "good-bye (for now)." I looked back over everything I made for the OCC and it was really hard to choose just one project, but in the end I settled on this card.


This fussy-cutting hydrangea card represents a couple things I think of as my style: clean and simple, and, well, fussy! For more details on the card you can click back to my original post from 2011.

I'm kind of at a loss for words as to how to sum this experience up - I've had the pleasure of working with so many wonderful and talented stampers, and I've loved the challenges I've gotten to play with over the past 3.5+ years. There have been times when if it weren't for the OCC, I probably wouldn't have been stamping and blogging at all, so I'm grateful to have had this opportunity. Best wishes to all my former and current teamies, and to the new OCC as it goes forward.

I hope I'll have a chance to be on another DT in the future - I'm guessing the spring and summer are going to be pretty busy and my posts may be sporadic. But I'll still be here when I can, work and other commitments notwithstanding!

Saturday, April 13, 2013

Pretty Punch Art

Hello again - well, the good news is that I'm feeling better, but the bad news is that I'm getting busier and finding it harder to get any stamping done. I'll keep trying, though! Anyway, today is Saturday so of course we have a new Our Creative Corner challenge for you. Rudlis is hosting today and asked us to use fashion/mannequins/style/stitching/etc. as our inspiration point. This was tough for me - I don't have any of those trendy dress stamps or dies, so I had to get creative!

 
I made this sweet little dress with a couple different punches and Twitterpated DP in Riding Hood Red (one of our retiring colors). The skirt is from the blossom builder punch, and the top is part of the owl punch - I cut the sweetheart neckline and the skirt's scallops myself. I added the ribbon punch for a belt with a punched flower and rhinestone trim. For the stand, I used a thin strip of Early Espresso card stock with a decorative label punch base and a mini ornament punch for the finial. The banner punch and red DP are non-SU - I embossed the DP with the dot folder. To set off the punch art I added the label with pierced edge and a strip of espresso DP. The sentiment, which I embossed in white, is from the retired set Watercolor Trio.
 
OK, you have your challenge - please join in with us this weekend! Make sure you check out what everyone else on the DT created as well. We are grateful for your participation! Have a great weekend!

Saturday, April 6, 2013

Thoroughly Modern Madison

Good morning! I'm back with my second challenge for Our Creative Corner. Here's what I came up with:


My hubby would never go for this bedroom, LOL! But sometimes I think the modern aesthetic is just very cool so that's what I was going for. This is my card:


This is one of those cards that when I sat down to make it, I really had no idea what I wanted to do. I actually started out using a sketch challenge but in the end I changed the layout completely because it just worked better this way. Since I have such good timing, I finally broke out the Madison Avenue stamp set that was recently available during Sale-a-Bration. Yeah, I didn't stamp too much during SAB. But these images spoke to me as a way to create some modern patterns with these bold colors (Raspberry Ripple, Island Indigo, More Mustard, and Soft Suede). Thanks to the Stamp-a-ma-jig the two background panels came together fairly quickly. I tried to use the Madison Avenue flower for the focal panel but it wasn't working somehow. This flower from World Treasures pulled everything together and keeps the modern feel. I added tiny punched circles from the cupcake and owl punches to bring in the indigo and mustard colors. My texture comes from the embossed stripe background, the popped-up elements, and the indigo brad. For my sentiment I grabbed the retired set Pocket Silhouettes and one of the bitty banner dies - after I cut it out, I glued it onto suede card stock and cut around it to make a layer to match the rest of the card.

I hope you'll play along with this challenge - I will admit that it might not be an easy one, but isn't that the point of a challenge? :) Be sure you visit the rest of the team and give them some love for their projects too. Have a wonderful weekend!

Thursday, April 4, 2013

Just believe in spring

Is spring actually coming? Today (at least here) the sun is shining and it's almost warm enough to go out without a coat... I'm hopeful that the snow will fully melt soon! I think I was channeling spring when I made this card. Something about it feels fresh, like the spring air outside...


My club will make this card tomorrow. I like to do something with a technique so we're going to do two-tone embossing. Not that there is much to this as a technique - but it's something we haven't done before. I also used the Mojo Monday sketch from this week.

The whole card came from the embossing - I wanted to use colors and I only had Gumball Green and Pool Party, LOL. I thought they would look striking with this image from Just Believe on Early Espresso card stock, and I think I was right - it turned out just like I hoped it would. The circle flower image is from the same stamp set, and the sentiment is from Itty Bitty Banners. I used DP from the 4x6 pack in the spring catalog - the name escapes me right now. And the large scallop trim was cut with the Tasteful Trim die and then embossed with the fan embossing folder. It all went onto a vanilla card base embossed with the woodgrain folder.

I just feel happy after making this - happy to be feeling better and back to stamping, and happy that spring is on its way! I hope you like the card and really appreciate your stopping by today!

Saturday, March 30, 2013

Dare to dream...

Hey, sorry to disappear there on you. Three weeks ago I woke up with awful spasms in my back - it's something I've had before and I assume it has to do with my TMJ. It has always gone away in the past but this time it's sticking around. I've spent a lot of hours resting with a heating pad, not able to do much more than read and browse the web on my laptop. I'm slowly getting better and I'm getting physical therapy now, but it's still hard to be up and around all day. Life does go on, though, and I really had to stamp this week because... I'm hosting the challenges at Our Creative Corner for the next two weeks! It's been a very long time since I've had the honor.

My challenge is to make a card or project inspired by travel and/or transportation, using at least two different designer papers. When I chose this challenge theme, I was in the midst of planning the trip my family is taking to Germany this summer. I absolutely love to travel, and this will be my first time to see Germany and my kids' first trip overseas. We are all really excited! Anyway, here is my card, using the colors from colourQ, which I haven't played in ages and love to pieces, and a sketch challenge that's new to me, Paper Craft Crew.


The stamp set I featured is called Postage Due. I stamped the collage image in Pool Party and then sponged Wisteria Wonder over the whole panel and Always Artichoke on the edges. (All the edges are distressed and sponged.) The postage stamps in this set are super cute, and I chose the "Paris" one. My two DPs come from the patterns pack and Twitterpated. I thought "dare to dream" was a perfect sentiment for thinking about travel - this stamp comes from Loving Thoughts. The card base is Core'dinations card stock sanded on the edge. Those little punched flowers started out a little simpler, but when I took the first photo I realized they just didn't look right and redid them. Sometimes I can let those things go, but it was easy enough to change, so perfectionism won out this time!

I hope you will play along with our challenge this week - we love to see what you come up with and we love when you join us in creating something special. Have a great weekend, and a happy Easter to those who celebrate - maybe spring is coming finally?? Hope so!