Wednesday, July 23, 2008

Hey! I made a Christmas card!

Remember my Christmas card challenge? where I said I'd make a Christmas card a week? Right. Well, it hasn't happened in a while now, so I've really fallen down on the job. But I just got back from my team meeting and the card we made was something I could make into a Christmas card. Woohoo! It also uses all new stuff, some of which I don't have. Yet...

This is definitely a nontraditional Christmas color combo - but I know some people out there like those! The card base is pink pirouette, with riding hood red and whisper white. This card was so quick and I really like it. I sponged the pink pirouette ink lightly on my white cardstock and then embossed the snowflakes with Versamark and silver EP. The stamp comes from the new level 3 hostess Holiday Happenings bundle, which is fabulous and I really hope I'm able to earn it. The background paper is from the Bella Rose pack, and the sentiment is from Heard from the Heart. What do you think? Is it Christmasy enough? :)

Monday, July 21, 2008

News of the week

Yesterday I said that this week I'd probably be scarce around here, and that's looking more and more true. Here is what's going on...

We have some family commitments and travel plans coming up in August, including my father-in-law's wedding. So the inspiration challenge is going to go on vacation until August 27. Sorry to have to skip this week but there is just too much to do. I have one more (large) freelance project to take care of this month, plus my studio is nowhere clean enough to host my stamping open house on August 22.

Also, my wonderful dear friend Trudy has moved to the Boston area from Illinois and I'll be seeing her and her kids tomorrow - yay!!

I've made a renewed effort to work some exercise into my days. I decided to get the Wii Fit and I love it - my goal is 30 minutes a day and 15 lbs lost in six months. Wish me luck! I can tell I've gotten horribly out of shape since I've been oh so sore since I started, but I think I'm less so this morning.

Finally, here are some kid funnies for you.

Ben, on realizing a light wasn't coming on as it should: "I tried to turn on the light but it's unbulbed."

Todd was reading to Sarah at bedtime a few days ago. He told her they were "all done reading." She turned around and looked at him and said, "And then snuggle?" Awww!

The other day Sarah was singing. I wasn't paying much attention but Todd said, "Is she singing the Pink Panther?" I listened, and it sure sounded like she was. Ben then told us that the babysitter sings it to Sarah while they bounce around the sitter's swimming pool.

It's been sooooo hot here - I hope that wherever you are, you are having a nicer summer than we are. It's been like Florida. And I can't even believe that summer will be over in just a few more weeks!

Sunday, July 20, 2008

Hugs for a Friend

I haven't played a featured stamper challenge in a few weeks - but I couldn't miss today's chance to CASE Susiestampalot, who does such wonderful work! I loved this card and picked it for my CASE. I thought it would be a good chance to try out some more of the new In Colors.

The only color I hadn't used yet was pacific point, so I wanted to get that out today. It's pretty bright, but it's growing on me. I paired it with kiwi kiss and baja breeze. I kept the same layout, although I think my card looks skinnier than Susie's, or is it just me?

For my background I used one of the prints from the Bella Rose paper pack. I used pacific point cardstock on all the layers and had to keep the swiss dots CB folder for the kiwi panel. I stamped the images from Wonderful You on very vanilla cardstock, as well as the sentiment, which is from Hero Arts. (Something to add to my wish list for the new catalog: more sentiments that fit inside circles!) This card is going to a special friend who's having a rough time right now, so I hope this cheers her up.

Instead of dew drops I used Martha Stewart half-back pearls. The card was almost all done when I realized I'd forgotten the ribbon treatment. I'd read on SCS that the olive poly-twill ribbon from the spring mini catalog matches kiwi kiss, so I thought I'd give that a try with a little bow. It is a pretty close match... but I'm a very matchy-matchy person so I can't wait until we can get "real" ribbon for these colors, LOL.

That's gonna be it for today. I may not be around much this coming week, but you know how I get when I don't get to stamp, so let's cross our fingers!

Friday, July 18, 2008

Post-It Note holder tutorial

OK, here's the tutorial I promised you earlier in the week. I made some post-it holders for Christmas last year, but I wasn't entirely happy with them. So after seeing Jen's version with a Velcro closure and Julie's version with a pen holder, I decided to combine the two into my own version. They are still surprisingly easy to make and I think super cute! I made mine with the new Bella Rose designer paper and coordinating cardstock in red riding hood red and kiwi kiss. This will be one of the ABC projects for my Stamping 102 class, although I think it will probably not look exactly like this one.

Disclaimer: I sized my holder to fit the mini gel pens that I bought at Staples. If you find different pens, you may need to adjust the measurements to fit.

Supplies:
9 1/2" x 3 3/4" cardstock sheet
Scor-Pal or other scoring tool (I highly recommend the Scor-Pal for this project)
3 3/4" x 3 3/8" piece of thin cardboard (the backing from the SU paper packs is perfect)
Two coordinating prints of patterned paper
Coordinating cardstock for layers (a scrap will probably do)
Sticky strip (1/4")
Velcro or magnetic closure (I used the magnetic closures by Basic Grey)
Mini pen
Post-it note 3x3 pad
Stamps, punches, embellishments as desired

Step 1. With the large cardstock panel lengthwise on your Scor-Pal, score at 1 3/4", 2 1/8", and 2 1/2". Here are more specific instructions on how I did this:

Score at 2 1/2".


Turn the cardstock the other direction and put your score line at the 3/4" mark and score at the 1 1/2" mark.


Move the outermost score line over 1/8" and score at the 1" mark.


Step 2. With the unscored end of the cardstock to the left, align the edge of the cardstock with the 1/4" mark and score at the 3" and 3 1/2" marks. (If you're not using a Scor-Pal, you will score at 2 3/4" and 3 1/4" from this end.)
Photobucket

Step 3. With the set of three score lines at the top, fold over the first score line into a flap.


Step 4. Open that flap and then fold on the third score line.


Step 5. The middle score line is going to fold the opposite way so that you get an M shape.


Step 6. Open the outer folds back up and hold the cardstock so that the middle score line is at the top, still folded. Cut a slit 1" from each edge, just to the score lines, cutting through both layers.


Step 7. Place the cardstock on your work surface so that the part you just cut forms a "mountain" in the center and put sticky strip on the bottom side of the mountain to the outside of both slits.


Step 8. Remove the tape backing and fold the taped portions down and the cut portion up to make the pen loop.


Step 9. Adhere cardboard to the center of the inside of the holder.
Photobucket

Step 10. Cover cardboard with patterned paper cut to 3 3/4" x 3 3/8".
Photobucket

Step 11. Cover inside flaps with contrasting paper cut to 3 5/8" x 1 5/8" and 3 5/8" x 2 5/8". (I didn't get a photo of this but you can see it further down when I add the post-it notes.)

Step 12. Cover outer flaps with cardstock and paper of your choice. (I actually meant not to use the same print so many times - if I were doing it over I'd make the inside and outside flaps in contrasting prints.) The size of my layers are:
cardstock: 3 5/8" x 1 1/2" and 3 5/8" x 2 1/2"
paper: 3 1/2" x 1 3/8" and 3 1/2" x 2 3/8"


Step 13. Attach post-it pad to inside; I like to use sticky strip for this. I also slide in the pen at this stage so that when I attach the closure, I know where it needs to go.


Step 14. Attach closure. If you are not going to decorate the front, you can attach it to the flaps. Or you can attach it to whatever you add to the front; see Jen's blog link above for this method. I attached it to the flaps but really should have done it Jen's way. Oops! Well, now you can see both.


Step 15. Decorate the front as you wish. For mine I used the small flower from Live Your Dream - side note, doesn't this just about match this paper perfectly? I am beside myself with the possibility that this set will be in the new catalog - colored with red riding hood red and kiwi kiss and a blender pen, and a stamp from Warm Words in red riding hood red. I made the scallops with the new scallop edge punch - love it!!

Thursday, July 17, 2008

Rubber Stamping 101 class samples

My major project this week is to make some headway in planning some classes I'm hoping to teach at my local community ed program this fall. Right now I'm planning to offer Rubber Stamping 101 and 102, each for three weeks and each offered twice. The 101 class will cover the very basics, with the students making six cards total. The 102 class will include some intermediate techniques, such as embossing, and also I'll add a couple of ABC projects.

Since I wasn't sure if the 102 class was actually an option, I started out by making samples for the 101 class. I have to say, this has been really hard for me. Why is that?? I'm sure a big part of it is trying to keep it simple. That is not really something I think about when I'm making cards, so it's a good challenge. I've been doing some catalog CASEing because that gives me a good model to work from. I'm not 100% sure that all of these will be the actual cards I do in the class, but at least it's a start. I would really love some feedback on these!


Here's my Poppin' Pastels card. Stamps are Baroque Motifs, in night of navy and certainly celery.


I CASEd this card from last year's holiday mini catalog. I really like the color combo of pink pirouette and red riding hood red with old olive. The sentiment is from the new set Heard from the Heart - I can't resist anything with that cursive writing on it! Love it!


I'll use this card to demo very simple two-step stamping and the rock & roll technique. I got the original idea from p. 82 of the spring catalog but I think my card looks quite different. I used the It's Beautiful wheel along with the flower from A Beautiful Thing. I really love the combination of chocolate chip with the new baja breeze. The sentiment is from Hugs & Wishes.


Here's my watercoloring sample and I'm pretty sure this one isn't going to stay. I just ordered Pun Fun and I think I want to use that instead. This card was another CASE from the holiday mini. I used Fun & Fast Notes, the flower from Think Happy Thoughts, and a sentiment from Sincere Salutations. I like the layout but the colors (regal rose, rose red, mellow moss, bordering blue) just aren't working for me... I dunno. What do you think?

Wednesday, July 16, 2008

Inspiration Challenge #29: Simplicity photo


A couple days ago I came across an old calendar I had with photos by Deborah Dewit Marchant. I have loved her photo calendars for a few years, although I haven't had one in a while. Unfortunately I wasn't having much luck finding her photography online, so the photo here is taken of the calendar page. I mostly gravitated toward this photo for the challenge because I loved the colors - and that was before I realized it would work with some of the new In Colors I just got yesterday!

I chose the new colors tangerine tango and baja breeze, along with chocolate chip, so saffron and very vanilla. The layout is today's SCS sketch challenge. It's a very nice layout to work with, although I struggled with it for some reason!

I started out by stamping the magnolia from Embrace Life in chocolate chip on vanilla cardstock. (Notice the magnolia tree in the photo? It's one of my favorite flowers.) Then using my ink pad and reinker I colored in the flowers in tangerine with a blender pen. I cut layers of chocolate chip and baja breeze cardstock, then edged all three with chocolate chip.
For the strip I took the journaling stamp from Live Your Dream and turned it so the lines were vertical. Using the Stamp-a-ma-jig, I stamped a series of pinstripes in chocolate chip on a vanilla strip, and then in between those lines I stamped more stripes in baja breeze. I layered this onto chocolate chip and tangerine cardstock (again edged with chocolate chip). All of this went onto a saffron card that I stamped with the linen background in saffron ink.

One item that came in yesterday's shipment was the aged copper hodgepodge hardware. I hadn't bought any before but since it's 20% off and about to retire, and I love copper, I decided to go for it. I stamped the sentiment from Short & Sweet onto tangerine cardstock with chocolate chip and put it inside a small oval frame. I mounted this with pop-up glue dots. To bring in a little more yellow, I tied a knot of apricot grosgrain ribbon (it's a very close match to saffron) onto a spiral clip and added that at the top.

Come play along with the challenge - I'd love to see your creations! The SCS keyword this week is DSIC29. Thanks for stopping by!

Monday, July 14, 2008

Home again, home again, jiggety jig

Well. I am convinced that I should never - EVER - travel to DC again. Once again I got caught in a horrible line of thunderstorms - ground stops and awful weather from the Midwest all the way east. Flights were getting cancelled left and right, so it seemed like we were just waiting for the other shoe to drop on our flight. As of our departure time, the plane we were supposed to be on was still in NYC and had been on the runway for two hours already. Looking out the window, it seemed like storm clouds were gathering in DC, too.

My friend Rachel and I, who were traveling together, took a proactive approach since American (unlike Jet Blue last time) would let us rebook for this morning with no fee. We were able to get our luggage back and return to the hotel where the rest of our friends were staying for another night. We were missing the kids, but not entirely disappointed to have a little more time to visit. When I talked to Todd before we rebooked, he gave the the OK, and then said, "The kids are fighting. I gotta go. See you tomorrow." I think everyone is thrilled that I'm now home!

It was a fun weekend. High points: Tea at the Mandarin Oriental hotel; seeing the Muppet exhibit at the Smithsonian; yummy birthday cake for a friend that we didn't miss since we stayed last night; catching up with friends and getting a little time away. Low points: I brought only one pair of shoes and they gave me blisters. We spent about 3-4 hours yesterday simply riding the Metro because of some work being done on the tracks. Last night, goes without saying, but we made the best of it!

I hope there are good things in store for my stamping readers this week. First and foremost, my shipment of new catalog preview goodies looks like it will arrive tomorrow - can't wait! I'll be having a busy stamping day on Wednesday, with the IC as usual and then I'm hoping to have some projects using my new stuff to post later in the day. I will also have a non-card project and tutorial to show you, as soon as I can get the time. Thankfully it's not as involved as the flip book! ;)

Have a great week and happy stamping!

Thursday, July 10, 2008

Heading out for the weekend...

I'll be away this weekend with some friends in DC. Woohoo! I'm really looking forward to a little getaway. So I won't be posting till I get back. Just wanted to give y'all a heads-up - hope to see you back here on Monday. Have a great weekend!

Wednesday, July 9, 2008

Inspiration Challenge #28: Hallmark gift bag


This week's inspiration again came out of some cleaning - this time it was Sarah's room. I found this adorable Hallmark bag from one of her baby gifts. I thought it would be a different sort of challenge since I don't usually pick these bright colors or this style of image. Hope you'll find it a fun challenge! This week's keyword for SCS is DSIC28.

I hope you can see on the bag that the flowers, purse, and shoes have glitter on them. I knew that I wanted to use glitter somehow - but I am glitter challenged! Every time I use it, it comes out looking awful. I was determined to make it work for this challenge. I used Julee's Mojo Monday sketch for my layout.


The first thing I tackled were the glittery flowers. I stamped the large flower from Enjoy Every Moment on white cardstock with Versamark. I did use the embossing buddy first, although the only color where that seemed to make a difference was with the darker pink. I applied heat and stick powder to the flowers, heated the images, then added the glitter and heated briefly to make sure the glitter would stick. I used the rose pink and light blue from SU's Fine Cosmo glitter, and the lighter pink is Miss Muffet art glitter from Barbara Trombley.

Even with the embossing buddy, some glitter always stuck to the page, but I was able to brush a lot of it off. I also ended up cutting out the flowers because the dots that went around the image just didn't look good with the glitter. Tip of the day: When using glitter on stamped images, choose an image without much detail and not too small. If you have your own tips on stamping with glitter, please share them with us!

To finish the flowers I stamped the 1/2" circle from the same stamp set and added celery SU glitter in the same way, then punched the circles and added to the flowers with glue dots. The leaves are from the SAB Friendship Blooms set and were cut out. I attached all the flowers and leaves to a narrow white panel with dimensionals - I like the out of the box look here. Then I layered the white onto a bashful blue panel.

The rest of the card was pretty quick. I did a celery scalloped panel to match the green scallops on the bag. Across the top I added a strip of pomegranate dot ribbon that came from a retired scrappin' kit. I added a sentiment from Many Happy Returns, oval punched and accented with crystal brads from Making Memories. The background is pretty in pink embossed with CB Swiss Dots, layered onto a pomegranate panel and a white card.

Hope you enjoy these summery colors! I'm already seeing the fall colors appearing in the catalogs I'm getting... so you'll probably be seeing them in my challenges in the not-too-distant future.

Oh, and speaking of colors, my new catty preorder shipped yesterday - woohoo! Hopefully next week I'll be able to show you lots of fun new stuff, and I can't wait to try out the new In Colors. They are much brighter than last year and I wasn't sure they would appeal to me, but I'm getting more excited to try them the more I see them on other demos' projects. So stay tuned for the unveiling next week!

Tuesday, July 8, 2008

Flip Album - my version, with tutorial


Okay, think waaaaay back to March, LOL. Remember this flip album that I made? Well, I've been revisiting it for a couple reasons. One was that a good friend requested that I make some for her, and I'm finally getting around to it - at least here's one done, LeAnn. :) The other reason is that after I posted my original album, a very sweet stamper - I don't remember her name, sorry! - took the time to look up my phone number and call me to ask me some questions about it, and I promised that someday I would make a tutorial on it. So I'm finally getting around to it, and I hope that wherever she is, she's reading and sees this!

My album is based on Chiaki Haverstick's directions here. I have made a few changes, which is why I'm doing my own tutorial - I don't want to take anything away from Chiaki's wonderful work or try to one-up her or anything, really! Mostly my changes relate to the fact that when I made mine, it didn't want to close very well, so I made some modifications that, for me, have helped with that issue.

I was also semi-inspired by Erin's lovely baby girl album. I started out intending to use this same scrappin' kit but I messed it up, so I used the wedding kit Tie the Knot instead. So, let's get started! Let me just say, do not attempt to do this when you are either tired or in a hurry, or both - it's a little complicated, and if anything in my tutorial doesn't make sense, please let me know! And remember, if you click the photos you can see them larger.

Supplies:
2 sheets 12x12 cardstock in color 1
1 or 2 sheets 12x12 cardstock in color 2 (I used 2)
Extra coordinating cardstock for layering (I used one sheet each of the two other colors in the kit)
Coordinating designer paper (I used 3 of the double-sided sheets in the kit)
Coordinating borders and stickers from kit (optional)
Paper trimmer
Scor-Pal or other scoring tool
Sticky strip or similar strong adhesive
SNAIL or other tape runner
Ribbon - one piece approx. 2 ft. in length
Cardstock, stickers, stamps, punches, etc., for decorating pages as desired

Step 1. Cut color 1 cardstock as follows:
6" x 12" (1 piece), 5.75" x 12" (3 pieces)

Step 2. Cut color 2 cardstock into 5.5" squares. You will need at least 4; I used both sheets to get 8.


Step 3. Score your 6x12 cardstock 2 7/8" and 2 5/8" from each end. If you're using the Scor-Pal, you can position the edge 1/8" in from the left, then move in another 1/4" for the second score line.


Step 4. Fold on each score line to make your cover. It will wrap around the flap pieces on the inside. When finished it will look like this:


Step 5. Score your other color 1 pieces 3" from each end. (Note: if using textured cardstock, you want to score them all on the same side - textured side up or down on all three. I scored with the textured side down.) Then fold on the score lines. These will make the inside flaps. I'll refer to them as the inside pieces.


Step 6. Take one of your inside pieces and apply sticky strip to the left flap. Leave at least 1/8" between the score line and where you place your tape.


Step 7. Take another of the inside pieces and line up the right score line with the right strip of tape on the bottom piece. This will leave the right flap of the top piece free to open and close. Remember to maintain that 1/8" clearance between the score lines on your top and bottom layers - this is important for helping the album to close well.


Step 8. Fold this left set of flaps closed and apply sticky strip to the flap on the right side of your bottom piece, again leaving at least 1/8" clearance from the score line (which should approximately line up with the folded flap).


Step 9. Attach third inside piece to the right flap in the same way as in step 7. When all three pieces are connected, it should look like this when open:


Step 10. Turn your attached inside pieces over (flaps should be facing down) and apply sticky strip to the solid square in the center. (I actually put the tape all the way around the square - just took the photo too soon. Sorry!)


Step 11. Take your cover piece and lay it on the work surface open, with the inside of the cover facing you. Place the center square of the inside pieces so that it is centered within the square of the cover piece and adhere. Now your album should look like this, first open:


And closed:


Step 12. Take four of your color 2 5.5" squares and decorate as desired. Remember that one is going to be on the front cover of your album.


Step 13. Take your strip of ribbon and wrap it around the closed album, leaving the same length of ribbon free on the right side on both ends.


Step 14. Take your decorated cover square and adhere sticky strip only on the left side - otherwise when you adhere it, it could stick to the rest of the album. Holding the ribbon in place, adhere the left side of the square to the left cover flap. I suggest leaving a slightly larger margin on the left side, or else the right edge of your cover piece on the other flap may show when the album is closed.


Step 15. Open this cover and secure the ribbon to the back of your decorated square with Scotch tape, then adhere a second square to the back of the first square so that your flap is now enclosed.

Step 16. Secure the ribbon to the back of your album with the tape runner.


Step 17. Repeat the same process for the other cover flap with your two remaining decorated squares, only this time the ribbon does not go between your squares. Keep it off to the right so that you can tie your bow when you're all done.


This shows the fourth square, open (the ribbon tail is covered up when this flap is open):

Now you are ready to decorate the rest of your album. You have five more square surfaces and eight flap surfaces. I ended up using some of the brown on my flaps and cutting a couple squares of a different color cardstock from the kit. Note: I highly recommend using the sticky strip to adhere your various pieces, especially if they are going onto textured cardstock.

If you wish to use layers for the flaps as I did, the measurements are:
Cardstock bottom layer is 5.5" x 2.75"
Designer paper or lighter cardstock layer is 5.25" x 2.5"


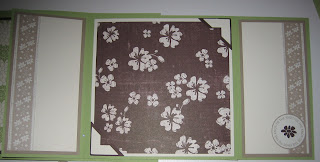
Here's how the rest of my album looks. This is the first flap open, showing the inside half of the "cover":


This shows the center and right of the album when the second cover flap is open:


Now I've opened the "This Day and Always" page to show the first set of flaps. The center "love" page is the back of the second set of flaps.


This shows the very back of the inside, once the second set of flaps is flipped over.


First set of flaps open:


Second set of flaps open:


The whole album opened up:

Whew! I think that was almost as much effort as making the album itself. ;) I really love how it turned out. I encourage you to try this out yourself - the scrappin' kits make it easy to embellish the pages since you can cut the border strips to whatever size you want or use your punches to change the shape of the stickers. If you do try this version, leave me a link so I can see your creation, and please give me feedback on the tutorial if anything is confusing or doesn't seem to work for you. This is my first time doing a tutorial as complex as this one and I want to know if something doesn't make sense. Really!

Here's a rundown of what I used in my album:
Tie the Knot Simply Scrappin' kit
Extra very vanilla plain cardstock for some layers and stamping
Chocolate chip and certainly celery ink
To Have and To Hold and Together Forever stamp sets
Kraft taffeta ribbon
Dimensionals for cover
Scallop, 1 1/4" and 1 3/8" circle, and photo corner punches

Quick challenge card


I had to play the color challenge today - it was one I wouldn't have thought of but I really like it: groovy guava, barely banana, and chocolate chip. To me those colors had to be a baby card, and I had someone ask me to make some, so there you go! It had to be a quick one today so I kept it pretty simple. The layout comes from last week's sketch challenge, which I didn't have a chance to try yet.

First I used the Cuttlebug Swiss Dots folder on a panel of banana cardstock. Then I chose two prints from the guava paper pack for the larger panels. I used the ticket corner punch and chocolate chip cardstock layers on everything.

The duck pulltoy image comes from Bundled in Love and the sentiment is from Short & Sweet. I added chocolate chip taffeta ribbon and mounted the duck with dimensionals - that's it!

I've been working for a couple days on a non-card project that I can't wait to show you. It will include a tutorial so I hope you'll check back - I'm planning to start working on my post tonight but I'm sure it will take a while. I'll just have to keep you in suspense till it's ready to unveil!