Tuesday, December 17, 2013

Classic Christmas

It's the most wonderful time of the year - and Christmas is coming up quickly! I'm back with another of my club Christmas cards. The inspiration for this card came from a card I found in an old Stampin' Success magazine (that's the publication SU sends its demonstrators, and it's always amazing). I'm submitting this for the Pink Elephant inspiration challenge.

 
I used a very traditional color scheme: Real Red, Old Olive, Crumb Cake, Baked Brown Sugar, and Whisper White. The image is from the hostess set Warmth & Wonder, colored with markers to omit the "noel" sentiment. I wanted to add this cute little banner (the die comes with one of the flip card thinlit sets) and the sentiment from More Merry Messages. Behind the cardinal I punched a wide oval and layered that onto a window frame die-cut, which is pierced with the piercing template.
 
For my background I used Crumb Cake card stock embossed with the poinsettia folder, over a label die-cut that I cut into two pieces in order to spread the color across the whole card base. The embossed panel hides the cut so it's easy-peasy! I added two very thin strips of red card stock and two candy dots as embellishments. I often keep my Christmas cards mostly flat so they are easy to mail, and this one works perfectly!
 
Thanks for visiting and I hope you are enjoying the beauty of the holidays this week!

December Paper Crafters Sampler

The last collection of the year is available now through Paper Crafters Sampler!


Here is a sneak peek of my card for this month's sampler:


You won't be disappointed by the wonderful projects available this month!

Thursday, December 12, 2013

Merry Little Christmas

Hi there! Are you in the Christmas spirit? I have to confess I had a bit of a tough time getting going, with Thanksgiving being right before everyone seemed to just fall into Christmas. But once we put up our tree, and we got some snow on the ground (just a little - not too much, yet) I started feeling that Christmas glow.

I'm making more Christmas cards this week for my club to stamp this weekend. They really enjoyed the last round and I'm looking forward to sharing more designs with them. This is the first one, and it was inspired by a card I saw in last year's holiday catalog. I'm doing three challenges with this card: Mojo Monday sketch, SUO Challenges (nontraditional Christmas), and CASology (snowflakes).


I'm not sure how I ended up with these colors - I wanted blue and chose Night of Navy, then in looking for something to put with it I just landed on Soft Suede. I think I like it! The main panel is from the holiday stamp set called Merry Little Christmas. I colored it with markers, then cut it out with the Chalk Talk die, then finally added the ornamental accents with the Stamp-a-ma-jig. It was easy to center them using the die-cut shape as a guide.

I hunted through everything I had looking for something to layer behind my tag. In the end I'm featuring a new product that will be available in January in the new spring catalog. It's called a Tag Topper punch and we have two coming out - the other one does a traditional angled tag. I just punched both ends to make a shape that fit my stamped panel. The card stock going into the punch is cut at 2" (actually I found I needed to shave just a hair off of that) and for this piece I cut the length at 3 3/8". Pretty sweet - I love finding little tricks to get my layers!

Another new product in the spring catalog is the scallop embossing folder. For the rest of my card I used navy dotted paper, two Festive Flurry snowflakes (I decorated one with the chalk marker), natural trim, white baker's twine, and a navy button. One more tip for you: to keep my white snowflake from sticking off the edge of the card, I cut a notch in one of the points and then hid that behind the ribbon.

What do you think of the nontraditional Christmas look? Of the two other cards I have planned as of now, one will be more traditional, and the other one ... won't! I like to mix it up sometimes! But you'll have to check back for those. In the meantime thanks for stopping by!

Thursday, December 5, 2013

Happy birthday, Mom!

My wonderful mom had a birthday yesterday so I had to wait until she received it (which I hope is today!) to post her card. I made this with two SCS challenges: Featured Stamper and Inspiration. The card I chose to CASE for the featured stamper Linda is this one. From the Horchow site for inspiration, I picked this bedding - classic and elegant, and both my mom and I love blue, so it was perfect! I'm also entering in Dynamic Duos for this week's challenge.

Here is my card:


When I saw the inspiration photo I immediately thought of this retired DSP in Midnight Muse, which I used for the large scallop circle. The flower image from You Are Loved (also retired) seemed to coordinate perfectly. Based on the inspiration piece and the DSP I chose, I put the Midnight Muse with Crumb Cake and Very Vanilla. I used the polka dot and finial press embossing folders for texture, and I pulled the stripes from the inspiration photo in with the punched pansy. I added a Crumb Cake button and Midnight Muse dahlia with a linen thread bow. The sentiment comes from PTI's Ruby Rose set.

Happy birthday Mom - I love you and I hope you love your card!

Thursday, November 21, 2013

Keepin' it simple, Christmas style

I'm doing a couple Christmas cards with my club for November and December, since my busy schedule isn't going to allow me to hold a Christmas card buffet this year. (So sad...) I told them I'd have at least one simple Christmas card, and lucky for them I had time to make two. I thought I would share how they turned out.

This first one is my very first attempt at the thinlits flip cards. I find myself stumped as to how to decorate this, so I left it pretty simple. I'm open to suggestions for what I could add, though! I'm submitting this to SUO Challenges since I used the Festive Flurry stamp set.


 For this next one I took the photo at the Curtain Call Inspiration Challenge as my starting point.


I used the extrafine gold glitter to add some sparkle to my tree and then embossed the gold foil paper to go behind it. This beautiful tree is featured in the set Special Season.

I'm going to keep the chatter simple as well and get on with my preparations for tomorrow night. I hope you enjoyed these CAS Christmas cards!

Wednesday, November 20, 2013

Places, please

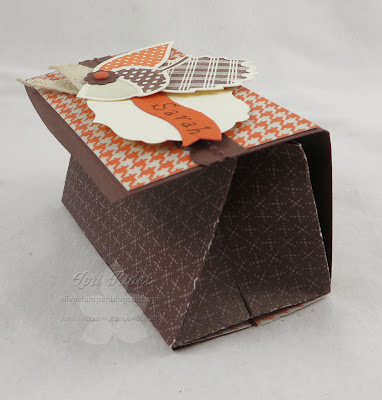
Hello! I know it's been a while since I posted a project. I can't seem to find much time for stamping these days. But this week my club is meeting so I have a good reason to make the time. For my 3D project I wanted to create a place card treat holder for Thanksgiving. I looked around online and didn't find instructions for a project I liked, so I created my own design. I'm entering this in the Paper Players challenge (clean and simple with leaves).

 
You can't really tell from the photo but when it's closed it's shaped like a triangle, then you open it to reveal the little treat bag on the inside. Granted, it won't hold a HUGE treat, but it's Thanksgiving so do you really need that much more to eat? ;) 


I took some photos as I made this project so you can see how I did it. You need a piece of designer paper 3" x 12". I recommend that the inside be a light color so you can see the score lines more easily. First, score it on the long side at 1", 4 1/2", 5 1/2", 6 1/2", 10", and 11". Rotate 90 degrees to the right and score on the short side at 1". Fold on all score lines and snip for flaps at the 1", 4 1/2", 6 1/2", and 10" score lines.


Turn the paper over and put sticky tape on the flaps as shown. NOTE: on the side flap, where I put a single strip of tape, you will want to add another strip next to the score line. Otherwise the side won't stay closed.


Peel off the backing from the tape and begin to assemble your bag. Start with the side that's on the left in the above photo.


The other side is a bit trickier. First fold in the 1" x 2" flap, then fold the last flap over top and seal all the edges. It will help to reach inside with a bone folder and go over all the tape.

 
Next you need a piece of card stock 3 1/2" x 6 1/2". You will score this at 2", 4", and 6 1/8". Fold on score lines and trim the corners off the flap. The opposite end of the card stock will attach to the bottom of your bag, so put sticky tape on three sides as shown. The flap will tuck under the bottom of the box to keep it closed, so you don't want any sticky tape on that side.


Line up the tape with the bottom of your designer paper bag. The score lines on the sides of the bag will fold in to make gussets when you close the box.
 
 
Tuck the flap under the bottom to close. Note that the more you tuck and untuck the flap, the less tightly it will close, so you may not want to handle it any more than necessary.
 

Now you can decorate the front! I used Sweater Weather designer paper and the Wonderfall stamp set. I put my daughter's name on this one and now she wants to take it away from me - I guess it gets her "stamp" of approval, LOL! I hope you'll try out this project and show me what you come up with!
 

Monday, November 11, 2013

November Paper Crafters Sampler


It's that time again - a new issue of Paper Crafters Sampler is available! The theme is Christmas and you will want to make all of the fabulous projects it includes. Here's a sneak peek of mine:


Have fun getting ready for the holiday season!

Tuesday, October 22, 2013

One week only: 25% off 25 stamp sets!

Hi everyone - quick newsflash that I thought you shouldn't miss hearing about! In honor of Stampin' Up!'s 25th anniversary (October 1988) for the next week only you can get a 25% discount on 25 stamp sets! There is something for everyone in this sale, which includes some of my favorite stamp sets. See all the sets here. Let's revisit some of my cards that feature the stamps on sale:

While you're shopping, check out this week's deals here. If you have been thinking of getting the Dress Up framelits this is your week! The Clearance Rack also has some great deals while supplies last.
 
I have a hostess code for online orders placed during this sale. Enter KUCBV7AZ in the hostess code box when you order and if the order total reaches $150, you'll be entered to win the hostess benefits. That's at least $25 in free stuff! Happy shopping and good luck!

Friday, October 18, 2013

File under Thank You

I'm back with my second project for my club members. You've seen those file folder cards that everyone is making with the new envelope punch board, right? I hadn't yet broken out mine so I thought it was the perfect opportunity. My stampers can make the card plus an envelope if they want. I was inspired by Catherine Pooler's card (here) but I did change it up some. I used orange and leaves so it qualifies for the Friday Mashup challenge too - yay!


I featured the Sweater Weather designer paper - the colors and patterns are so great for fall. And I love being able to make a matching envelope so easily!


The front of my card uses one of the Deco Labels framelits (on sale right now!) and I lined the die up with the edge of the paper when I ran it through the Big Shot - this is a piece of cake with the magnetic platform. The leaves are Magnificent Maple (single stamp) and Wonderfall, and the sentiment comes from one of the photopolymer sets, Another Thank You. I really love this sentiment - it makes such a statement! I used buttons for accents along with a strip of burlap ribbon.


I also decorated the inside of this card - just a strip of DP added before I punched the edge. (The card front is also covered with DP before punching.) I used an accent strip from the rotary cutter addition to our paper trimmer - a very slick little tool! Just a note on my card. I slid the card to the right just a bit for the very first punched folder tab. I wanted the tab to start right on the edge of the card. Otherwise I followed the tutorial. The front of my card wasn't trimmed down so the tabs would be even - not the way most people are doing it but I prefer this look for whatever reason!

If you don't have this tool yet you're going to want it for sure - I'm already seeing other ideas popping up for things to make so it's good for much more than just envelopes and cards. Stay tuned - I'm sure I'll be playing with it again soon!

Oh Halloween Tree

Halloween tree? Yep, that's what I said. Halloween is my hubby's favorite holiday, and it's pretty big with my kids as well. They wanted to get some new decorations and one of the things we found at Tuesday Morning was a cool tree that was just calling out to me for some ornaments. I can't say I've filled it up yet, but if I make a few every year it shouldn't take long...


We will make these at my club tonight so I hope they like them! I didn't realize Halloween ornaments were such a big thing - I found so many inspirational ideas. The ones that I ended up drawing from are here, here, and here, plus this card by Amy O'Neill. I'm also entering these in the Pink Elephant challenge - great inspiration photo for Halloween!


I'll start with the simplest one - both images are from the Best of Halloween set. I stamped the silhouette on (oops, retired) text designer paper and made a glitter frame behind the main oval with the new ultrafine black glitter from the holiday catalog.


This glitter is so pretty and sparkly - I love it! (I have also now reinked my black ink pad - oops again!)


Next is the witch's hat - from the same stamp set. This one took the longest to do.


It's hard to see in the sunlight but the reflective circle is punched from the silver foil paper in the holiday catalog. I used Summer Starfruit and Modern Medley DP for the remaining layers. The florette is made with two 2" strips adhered together. The sentiment is from Delightful Dozen.

Last, featuring the large stamp from Halloween Bash.


The main panel was stamped with Basic Black, Tangerine Tango and Rich Razzleberry markers, cut with one of the label framelits, and paper pierced using the piercing template. I cut a banner from silver glimmer paper and accented it with razzleberry ribbon, then put the whole thing on more Modern Medley DP.

I had more ideas but ran out of time - I think just three will keep my stampers busy and happy. I'll save the rest for another day!

Thursday, October 10, 2013

October Paper Crafters Sampler

Time for another installment of the Paper Crafters Sampler! This month the theme is Thanksgiving.


The projects are fabulous as always, so I hope you'll take a peek. Here's a preview of what I created this month:


Come and join in the fun - you know you want to! Happy stamping!

Saturday, October 5, 2013

Way overdue...

I gave my blog a little fall-themed facelift with the help of MDS for the header. Take a peek and tell me what you think!

Pop of Pink Pickup

Ah, the weekend... thank goodness! Unfortunately I'm still fighting illness - maybe a new cold or a continuation of the old one, I'm not sure. But life goes on... I felt like stamping this morning so I created this card for the Fusion Card Challenge and Friday Mashup (fussy cutting).


The Fusion challenge includes an inspiration photo and a sketch, and you can use one or both for your creation. I *mostly* used the sketch, except I changed the banners. I'm normally a follow-the-rules kind of girl, but sometimes I just have to stray if my inner artist thinks it's the right thing to do! This image from PTI's Tremendous Treats Birthday set was perfect for the inspiration photo. I tried something new and used an N2 Copic marker to shade the white truck. I took a cue from the photo and chose several graphic patterns from the Neutrals paper pack in white, gray and black, then I pulled in the pop of pink with Melon Mambo Core'dinations card stock. The sentiment is by Great Impressions and the frame die is by Sizzix (non-SU).

I hope everyone has a great weekend - and I hope I can finally kick these germs to the curb soon! Thanks for visiting!

Monday, September 30, 2013

Poppy Seed Wishes

I'm happy to be almost 100% healthy again - it seemed like a great time to do some stamping. I really felt like getting my Copics out and playing a couple challenges: The Paper Players tic-tac-toe challenge (I chose birthday/pearls/banners) and the Sweet Sunday Sketch. I hadn't gotten a chance to play with these stamps from Wplus9 which were perfect for this card.


I colored the poppies with Copics R14, R17 and E07. The color was a good match for the retired Poppy Parade ink, so I used that to stamp the banner and sentiment. I fussy-cut the poppies and popped them up on the frame. The background paper is from my stash, and the black is from the Neutrals pattern pack in the current catalog. I used a Martha Stewart border punch for the black strip at the bottom, then added the pearls for the final touch.

I seem to have stayed up way past my bedtime - oops! But I think it was worth it - stamping is my happy place and it's good to be back! Have a great week, everyone!

Saturday, September 28, 2013

I meant what I said...

I really was going to make cards over the past week. I swear I was. But the germs that settled in on Saturday had other ideas. I've been coughing and feverish and generally feeling awful ever since. A couple times I tried to get going on an idea and I just had to put it aside and go back to bed. Finally I felt well enough tonight to actually try to finish a card. Here's what I came up with:


This is for three challenges: Color Throwdown (Pacific Point, So Saffron, Marina Mist, Lucky Limeade)
Stampin' Royalty (Trendy Triangles)
The Pink Elephant (Dots and Stripes)

The triangles immediately made me think of Pennant Parade - I've been thinking I need more birthday cards. The stamps I used to accent the pennants are from several different sets: A Fitting Occasion, Pretty Petites (retired Sale-a-Bration), Itty Bitty Bits (retired) as well as Pennant Parade. I used retired So Saffron and Pacific Point papers, along with the dot print in the current pattern pack in Marina Mist. The sentiment is by Taylored Expressions. I attached all the pennants to Pacific Point ribbon with dimensionals.

These fun colors and all the patterns are cheering me up - I hope you enjoy the card. I'm going to keep trying to stick to my challenge-playing goals so stay tuned and come back soon! Have a great weekend!

Friday, September 20, 2013

You are everything to me...

Hello, stampers! I want to start with some good news: yesterday I found out that I was chosen as a winner in Shelli Gardner's blog challenge. (This is my winning card.) I was so honored to be chosen, and I want to take the opportunity to wish Shelli continued good recovery from her recent horseback-riding accident, and to say welcome to anyone who might be new to my blog. I'm so happy to have you here, whether you are a new subscriber, a longtime fan, or just stopping by!

Today's card is for my husband - our 13th wedding anniversary is on Monday. Hey, the last-minute queen actually got something done three days early! The layout for the card came from Create with Connie and Mary, and I also made this card for the SUO Challenges blog (use your favorite technique: I chose fussy cutting) and CAS-ual Fridays (use fall colors and at least one leaf). I think Todd will like this fall-themed card - I was inspired by the row of maple trees we have in our back yard. If we are lucky to have a beautiful fall season, the leaves turn the most gorgeous colors of red, orange and yellow. While we wait for all the leaves to turn, we can imagine what they might look like in a couple weeks, and that's what was in my mind as I made this card.


I started out with a retired paper panel in Cajun Craze and stamped the Magnificent Maple single stamp (second generation) with Early Espresso and sponged the edges. For the main leaf I used the same stamp, inked with daubers in Crushed Curry, Cajun Craze, Cherry Cobbler and Early Espresso. Behind it I put a cherry leaf from the Autumn Accents die, embossed with the woodgrain folder and sponged. The espresso banner was embossed with the square lattice folder, then I added the sentiment from Petite Pairs and the Cajun Craze button tied with linen thread. I fiddled with the sketch a little - sometimes you just need to give an element a little tilt!

I am still catching up with life but I'm hopeful this is finally the start of more frequent posts from me. At least, I'm going to try - so many of my favorite challenges have been passing me by for too long! Thanks again for visiting and have a wonderful day!

Tuesday, September 10, 2013

September Paper Crafters Sampler

It's that time again - the new Paper Crafters Sampler is now available! I think you will guess what the theme is this month...

 
You want a sneak peek of my project, right? Here you go...
 
 
Please take a look at the sampler and consider joining us this month!


Monday, September 2, 2013

Hello, lovely hexagons!

Have you missed me? I am just back home from a really wonderful family adventure. My husband and I were fortunate to be able to take our kids to Germany for the month of August (well, mostly Germany - we also spent three days in Prague). My cousin got married there on the 17th so we just decided to make a big event out of it! We had a fantastic time and I'm sure you'll be seeing the photos in some MDS projects coming up.

I'm looking forward to getting back to my stamps, but in the meantime I do have a card to share that I couldn't post before I left home. I thought I'd better hurry up and share it because the stampin' world is already moving on to fall and the holidays, and this card is neither of those things! My wonderful upline Nola Burkhard organized a swap for her team this summer. I had a lot of fun with this card and I can't wait to see what else my stampin' colleagues have come up with. Here's my card:


I was inspired by this card (the first one) and another non-SU card I saw on Pinterest that featured a group of hexagons. I used a lot of new products, but I wanted to mainly feature the Six Sided Sampler and Hello, Lovely stamp sets, neither of which I'd broken out yet. The colors are Strawberry Slush, Pool Party, Baked Brown Sugar, Early Espresso and white.

Banners are so hot and trendy right now, aren't they? They are fun to use, so I'm not quite sick of them yet. I used the mosaic DP pack, espresso dots from the Neutrals pack, Pool Party Core'dinations card stock (embossed with the honeycomb folder) and a debossed strip of brown sugar card stock, which I decorated with faux stitching to try to make it look like marker. For an accent I used the Simply Pressed clay tinted with Strawberry Slush reinker. These are really fun to play with, and if you haven't tried them yet, my big tip for you is this: after you put the clay in the molds, put the molds in the freezer. I think I was shooting for about 30 minutes, but I forgot one batch and left them in longer with no ill effect. The flowers always come out better than the buttons, so I recommend leaving the buttons in the freezer even longer. I still have trouble getting the buttons to come out perfect, but I won't give up!

Okay, I hope you will see me back posting regularly soon. Jet lag or not, the kids go back to school on Wednesday. The summer just flew by for us - I hope everyone out there enjoyed theirs and is ready to welcome fall!

Saturday, August 10, 2013

August Paper Crafters Sampler

It's that time again - the new Paper Crafters Sampler release day! The theme this month is Prelude to Fall.


I had a lot of fun creating my 3D project for this month. Here's a sneak peek for you!


I promise you will love this month's projects, so I hope you will subscribe and join in the fun!

Wednesday, July 10, 2013

Exciting news!

Today is the day I get to share my news with you... I've been asked to join the design team for the Paper Crafters Sampler. If you haven't seen PCS before, on the 10th of the month you can get a new selection of SUO projects with instructions (including 3D templates) designed by super-talented SU demonstrators. I can tell you the projects are fabulous - the theme for this month is Sand and Sea.


Here is a sneak peek of my beachy card - you can see the whole card, along with the rest of the projects, once you've purchased the July sampler. All of the DT members are giving sneak peeks today, so check out their blogs for more of a taste of what you will get.


I hope you'll check it out - I'm really excited to be part of this team!

Monday, July 1, 2013

Stampin' Up! News for July

Hi y'all! I do have some exciting news for myself, but it's a few more days until I can let you in on the secret. I've been busy working on this new project, as well as spending time with family, so I haven't been able to play any challenges recently. Hopefully soon!

In the meantime, Stampin' Up! announced several news items for July:

(1) Designer paper is buy three get one free! I love this special and I'm so happy to see it back this year.

(2) The new "Best Of" stamp set this month is called Best of Shelli - Shelli Gardner, our fabulous CEO, selected these images herself!

(3) There is a new clear (photopolymer) stamp set available called Settin' Sail. It's super cute with trendy banners and a hexagon to go with our new punch. Item number 133453 - I'm not seeing a flyer up yet but here is what they look like:


If you want to order any of these items, or anything else, don't forget I have a mystery hostess promo going on now. See this post for more info. Hope everyone has a great week and a happy Fourth of July!

Saturday, June 29, 2013

Mystery hostess time!

I'm offering a hostess code for online orders through July 15. Here's all you have to do:

Shop online (with me as your demonstrator) and enter the hostess code SSGZJBQ6 in the appropriate box. Your order can be any amount - and don't forget to check the clearance rack for the new items that were added this week!

If orders placed with the code reach $150, I will pick one customer from the orders placed to win $25 in hostess dollars! I will choose the winner on July 16.

Happy shopping!

What to Washi class and bundle

Our next online class--What to Washi--is now available. Offering seven different sections of Washi wisdom, this class includes everything you need to know to make the most of one of the hottest crafting trends out there. Originating in Japan, Washi Tape has taken the crafting world by storm, offering an incredibly quick, easy way to add a fresh, colorful look to any project. What to Washi explores a myriad of Washi options and provides much more than the basics for you to begin your own Washi adventures.  Divided into seven PDF documents, this class includes written instructions, step-out photos, instructional videos, and supply lists for more than 30 projects.  

The following topics are covered in the class:
  • The Washi Basics
  • Washi--The Next Step
  • Above and Beyond
  • Sharing Washi with Others
  • Memory Keeping
  • Storage
  • Only the Beginning . . .
What to Washi Class:  item 134742
Price:  $14.95
 
And wait, there's more! This class is also being offered as part of the What to Washi Bundle. When you order the bundle you receive everything listed below:
  • What to Washi Class
  • Epic Day This and That Designer Washi Tape
  • Gingham Garden Designer Washi Tape
  • Season of Style Designer Washi Tape
  • Witches Brew Designer Washi Tape
  • 20 Whisper White Note Cards & Envelopes
Each Washi Tape package contains three coordinating rolls of Stampin' Up!'s exclusive Washi Tape for a total of 12 rolls. And when you order the What to Washi Bundle, you'll be the first to receive our Season of Style and Witches Brew Washi Tape packages; they aren't available to individual purchase until August 1! 

What to Washi Bundle:  item 134743
Price:  $36.95

PC Instructions
The files will be downloaded as archive files that you can then extract and save on your computer. When you click on the download link, an extraction program will automatically launch. Choose the location where you would like to save the files (be sure to note where you save them). Follow the prompts on the extraction program, then navigate to the location where you saved the files. Click on the file and open.
Mac Instructions
When you click on the download link, the file will be mounted as a drive. Once it is mounted, open the drive and drag and drop the files to the location of your choice on your hard drive. The files can then be opened.

Thursday, June 13, 2013

Hello, Dahlia

Hello again! I have card #2 for you. I have always wanted to play along with the Play Date Cafe but hadn't had a chance until today. The idea of black and white with a splash of apricot really intrigued me as a challenge. I decided Crisp Cantaloupe was close enough and went with that color. Such a clean and modern color scheme seemed to pair really well for the new challenge at CAS(E) This Sketch. I'm also considering this a one-layer card (in my mind, dimensionals are required and don't count!) for the Ways to Use It challenge on Splitcoaststampers.


Here is my card featuring the new stamp set called Regarding Dahlias:


This is something very different for me and I'm really pleased with the result. On the white card layer I used the Simply Scored borders plate to emboss the left side, then I stamped the flower and sentiment in Basic Black. Stamping the flower again in cantaloupe on a scrap allowed me to cut out and pop up the center for the splash of color. I felt like the color needed to come in somewhere else, though, so I colored some pearls with a Sharpie and added them as accents to the scalloped border.

I have to say, I have had so much fun this week. It's been such a treat to spend so much time creating. This will probably be the end of my stamping for a few days, but I will be back as soon as I can to keep the creations coming!