I'm here for a quick post - yep, it's club week again and I thought I'd share one of the projects I've come up with so far. I wanted to use the Tweet Leaves stamp and saw a card on the Stampin' Connection board for demonstrators that used this emboss resist stencil technique. It worked well with the sketch challenge on Splitcoast today so I went with that.
I stamped the Tweet Leaves onto vanilla card stock and clear embossed, then used the Autumn Accents leaf die cut as a stencil and sponged on Pool Party and Crumb Cake ink. I used one of the mini punches for an accent with vanilla brads, then used a punched border and strip of DP for the background. The sentiment from Lacey & Lovely finishes off this clean and simple design.
OK, I gotta run! Thanks for visiting today and happy Halloween!
Wednesday, October 31, 2012
Wednesday, October 10, 2012
Boo!
Hey, it's me again! I know I said I wasn't going to be posting much, but I just really wanted to share this Halloween card I came up with for my club. I promised them we'd make a Halloween card this weekend, and then I realized... I didn't buy any of the new Halloween stuff! Trying to be frugal, and all that... Anyway, I did have Spooky Bingo Bits so I was trying to figure out what to do with it. Then I saw another card (non-SU) that had a canning jar full of spiders, and I wondered - what could I put in the jar from Perfectly Preserved? I guess a jar of jack-o-lanterns wouldn't really happen, but artistic license means it's OK, right?
I'm submitting this for three challenges: colourQ, SCS sketch (wow, it's been ages since I posted a card there!) and Hand Stamped Sentiments (use pumpkins).
What do you think? Even though Todd loves Halloween I think this card might be one that makes him scratch his head - he doesn't get the creatively cute ones. I kind of think it's adorable and hope my club members do as well! ETA: I showed it to Todd - and I was right. He said, "Brains go in jars, not baby pumpkins!" LOL! Please tell me it's more cute than crazy!
I'm submitting this for three challenges: colourQ, SCS sketch (wow, it's been ages since I posted a card there!) and Hand Stamped Sentiments (use pumpkins).
I flipped the sketch, fudged the circle placement somewhat, and tilted the #2 panel a little - it just seemed to need a little extra something! I also subbed Wisteria Wonder for the orchid in the color challenge to keep it current. The Halloween sentiment comes from Delightful Dozen and the tangerine DP from International Bazaar.What do you think? Even though Todd loves Halloween I think this card might be one that makes him scratch his head - he doesn't get the creatively cute ones. I kind of think it's adorable and hope my club members do as well! ETA: I showed it to Todd - and I was right. He said, "Brains go in jars, not baby pumpkins!" LOL! Please tell me it's more cute than crazy!
Monday, October 8, 2012
Popping in for a quick post
Hi everyone! I needed to make this card a couple weeks ago, and since I really liked how it turned out I snapped a pic in hopes of getting it posted at some point. Today I finally had a minute to spare!
This is a small card - 3 1/2" x 4 7/8", otherwise known as 4-bar size. The label and medallion stamps both come from Everything Eleanor - such a pretty set. The sentiment is from P.S. I Love You - is that retired? I have no idea, LOL! The colors are Cherry Cobbler, Soft Suede, Crumb Cake and Very Vanilla. I accented the Little Leaves die cut with some berries made from the cupcake punch. The background uses a couple of the DP patterns from the color families plus a vanilla scalloped border. It came together pretty easily, and I like it so much I think I will remake it as a thank-you note for my Etsy shop in some other color scheme(s). It could even work as a holiday design for Christmas cards or notes!
I want to say thank you to everyone who posted such lovely and encouraging comments to me after my last post. I really appreciate everyone's kind thoughts and prayers. I wish I had an update but nothing has really happened - we seem to be in a holding pattern waiting to hear on our latest appeal. I have been keeping very busy in the meantime, and I'm hoping we get news sometime soon. Thanks again to all my loyal readers/followers/subscribers - I will see you again soon, I hope!
This is a small card - 3 1/2" x 4 7/8", otherwise known as 4-bar size. The label and medallion stamps both come from Everything Eleanor - such a pretty set. The sentiment is from P.S. I Love You - is that retired? I have no idea, LOL! The colors are Cherry Cobbler, Soft Suede, Crumb Cake and Very Vanilla. I accented the Little Leaves die cut with some berries made from the cupcake punch. The background uses a couple of the DP patterns from the color families plus a vanilla scalloped border. It came together pretty easily, and I like it so much I think I will remake it as a thank-you note for my Etsy shop in some other color scheme(s). It could even work as a holiday design for Christmas cards or notes!
I want to say thank you to everyone who posted such lovely and encouraging comments to me after my last post. I really appreciate everyone's kind thoughts and prayers. I wish I had an update but nothing has really happened - we seem to be in a holding pattern waiting to hear on our latest appeal. I have been keeping very busy in the meantime, and I'm hoping we get news sometime soon. Thanks again to all my loyal readers/followers/subscribers - I will see you again soon, I hope!
Friday, September 7, 2012
So here's the situation
I am sad to say I'm going to be taking an indefinite break from blogging. Todd has been dealing with an intellectual property dispute for going on three years, and this summer we've had to retain a lawyer to try to get some justice in the situation. The person who stole Todd's research has thus far gotten away with it, and we're not going to stop trying to change that. But it comes at some financial cost to us, obviously, and we don't know how long it's going to take. So I've committed to helping our finances by taking more freelance work - and doing less crafting (and shopping for crafting... ahem).
I will still be an SU demo and holding my monthly club, so I might get time to pop in and post now and then. But it will be sporadic at best for the forseeable future. I am going to miss my crafts like crazy - and not having time to do any may MAKE me crazy. But that's the fact of life right now. :(
If you have a moment to pray for justice - this kind of evil just shouldn't be OK - and for our sanity, it would be much appreciated. I will try to post an update if there is good news, and I'm crossing my fingers that once in a while I will get a free moment to stamp something! In the meantime, thanks for reading and supporting my work here. It means more than I can say.
I will still be an SU demo and holding my monthly club, so I might get time to pop in and post now and then. But it will be sporadic at best for the forseeable future. I am going to miss my crafts like crazy - and not having time to do any may MAKE me crazy. But that's the fact of life right now. :(
If you have a moment to pray for justice - this kind of evil just shouldn't be OK - and for our sanity, it would be much appreciated. I will try to post an update if there is good news, and I'm crossing my fingers that once in a while I will get a free moment to stamp something! In the meantime, thanks for reading and supporting my work here. It means more than I can say.
Friday, August 10, 2012
Taking a little break
Hi y'all - just a quick post to say I'm taking about a month off to spend time with my family before the crazy school year starts back up. I've really enjoyed posting more regularly here again, and I'm going to miss it, but it's been such a hectic summer and it's time for a little R&R. See you in September! Thanks to everyone who reads and comments - you are all much appreciated! Hope you all enjoy the rest of the summer!
Saturday, August 4, 2012
Heavens to Betsy!
Whew, these Saturdays roll around quickly, don't they? Time for a new challenge at Our Creative Corner! We have a new hostess this week, Paula McClane, and she is asking us to combine bling with nature elements in our projects. Here's what I came up with:
I was about halfway through making this card (which was already my second try) when I realized I had just used the Betsy's Blossoms set two weeks ago. Well, I would have to say it's one of my favorite new sets, so I couldn't help reaching for it again! I combined a couple of other challenges with this one: colourQ and Freshly Made Sketches.
I did make some subs with the colors - I accidentally used Blushing Bride for my light pink, and instead of poppy I used Melon Mambo. I struggled a little with the layout, but when I was playing around with my label die-cuts and ended up with a skinny frame of the melon polka-dot DP, something clicked. The scalloped border on the right side is a new edgelit, the Blushing Bride DP is retired, and the sentiment is from another new set called Sweet Essentials.
I hope everyone has a great weekend - be sure you visit the OCC blog to see the rest of the creations from our wonderful team. It's always one of my favorite moments in each week when I get to see what they've come up with. And we love to see your work as well so please play along with us!
I was about halfway through making this card (which was already my second try) when I realized I had just used the Betsy's Blossoms set two weeks ago. Well, I would have to say it's one of my favorite new sets, so I couldn't help reaching for it again! I combined a couple of other challenges with this one: colourQ and Freshly Made Sketches.
I hope everyone has a great weekend - be sure you visit the OCC blog to see the rest of the creations from our wonderful team. It's always one of my favorite moments in each week when I get to see what they've come up with. And we love to see your work as well so please play along with us!
Saturday, July 28, 2012
Serene Summer Silhouettes
Whew, it was another busy week. It's probably going to stay that way for the next little while, but I'll keep trying to post! Today it's time for my second challenge at Our Creative Corner. For this week I chose this photo of round fabric buttons for inspiration and came up with what I think is a fun challenge.
For my card I kept it pretty clean and simple this week.
I created the background and center strip with images from Summer Silhouettes, and the main image is from Serene Silhouettes. Give me a set with "silhouettes" in the name and I'm all over it, LOL! My colors are Poppy Parade, Lucky Limeade, Blushing Bride, white, and black. The sentiment is from Bring on the Cake, and the only non-SU product used was the 2" scalloped circle punch.
I'm outta here for today, but before I go of course I have to remind you to visit the OCC blog to see the rest of the samples from the team. There's a ton of stamping eye candy for you this week! Thanks for visiting and have a great weekend!
Saturday, July 21, 2012
Eleanor's Blossoms
Good morning! I missed my stamps this week - there was just a lot of other stuff going on. But I'm here today as hostess of the challenge at Our Creative Corner for the next two weeks. I'm calling this week's challenge What Not to Stamp - it's a card makeover challenge! You can read the full description on the OCC blog, but to summarize it here, pick an old card (one you have a photo of), then CASE it with a makeover. It took a bit of courage for me to dive back into five-year-old card photos - wow, some of my first efforts were so.... awful! In the end I picked this 2007 card to do over. This was one of the first cards I published on my blog.
You can read more about this card here. The things I liked about this card were the background technique (I made it with a swim diaper, LOL!) and the colors with accents of gold. I also chose to use swirls, flowers, and a bird on my remake. I took my layout from the Pals Paper Arts sketch challenge, and I'm also entering this card in the Stampin' Royalty Anything Goes challenge. Here's my new card:
I used two stamp sets for my images: Everything Eleanor and Betsy's Blossoms. I started by making the Baja Breeze background panel by stamping the swirl all over with Early Espresso ink. I used the new gold pen (coming in the holiday catalog on August 1) to add accents around the swirls. For the center panel I started with naturals ivory card stock and sponged on some Baja Breeze ink with saran wrap and a paper towel. Over that I sprayed gold shimmer mist and sponged Early Espresso on the edges. Here's a close-up photo that shows some of the details a little more.
The Baja Breeze shaped element stamp is from the Eleanor set, with the bird and leaf from the Betsy set. To make those crisp and clean leaves look a little more vintage and distressed, I inked the stamp and then kissed it with a clean paper towel. I brought in gold accents with two (retired) brads. Finishing touches were a sentiment from Lacy & Lovely, a strip of crochet trim, and an accent flower. It's die cut with the new flower Framelits (the smallest one) cut out from a stamped flower in Primrose Petals. In the center I put one of those super-cute new In Color dahlia adornments.
Wasn't this fun? I hope you're inspired to find one of your old cards and make it over with us this week. Don't forget to check out the amazing transformations from the rest of the OCC team - they are fabulous!
You can read more about this card here. The things I liked about this card were the background technique (I made it with a swim diaper, LOL!) and the colors with accents of gold. I also chose to use swirls, flowers, and a bird on my remake. I took my layout from the Pals Paper Arts sketch challenge, and I'm also entering this card in the Stampin' Royalty Anything Goes challenge. Here's my new card:
I used two stamp sets for my images: Everything Eleanor and Betsy's Blossoms. I started by making the Baja Breeze background panel by stamping the swirl all over with Early Espresso ink. I used the new gold pen (coming in the holiday catalog on August 1) to add accents around the swirls. For the center panel I started with naturals ivory card stock and sponged on some Baja Breeze ink with saran wrap and a paper towel. Over that I sprayed gold shimmer mist and sponged Early Espresso on the edges. Here's a close-up photo that shows some of the details a little more.
The Baja Breeze shaped element stamp is from the Eleanor set, with the bird and leaf from the Betsy set. To make those crisp and clean leaves look a little more vintage and distressed, I inked the stamp and then kissed it with a clean paper towel. I brought in gold accents with two (retired) brads. Finishing touches were a sentiment from Lacy & Lovely, a strip of crochet trim, and an accent flower. It's die cut with the new flower Framelits (the smallest one) cut out from a stamped flower in Primrose Petals. In the center I put one of those super-cute new In Color dahlia adornments.
Wasn't this fun? I hope you're inspired to find one of your old cards and make it over with us this week. Don't forget to check out the amazing transformations from the rest of the OCC team - they are fabulous!
Labels:
Our Creative Corner,
sketch challenge,
Stampin' Up,
vintage
Saturday, July 14, 2012
Island Night Rose
Good morning! It's time for another challenge with Our Creative Corner. Our hostess again this week is Sharon Wheet, and this week the challenge is to use navy and pink plus another color of your choice. I picked Island Indigo to go with Night of Navy (of course) and Regal Rose. I think these colors look pretty fabulous together!
The featured stamp image is from Embellished Events - a fun new stamp set in the catalog. I colored it with markers, punched with the 2 1/2" circle punch, and placed that on top of a scallop square die cut that I embossed with polka dots. I added some rhinestones in the corners and a sentiment from Create a Cupcake, punched with the decorative label punch. For the background I used some retired rose DP, two strips of indigo ribbon, and indigo card stock embossed with the stripe folder.
Make sure you stop by the OCC blog for this challenge - especially because we are welcoming our wonderful new DT members today! You'll love seeing their creations each week and playing along with all of us!
Wednesday, July 11, 2012
Tea for two challenges
What to do when I'm caught up with my work? Catch up on my crafting, of course! I've looked longingly at the Embellish magazine challenges for a long time now but I've never managed to actually play along with one. Today was the day to change that. The current challenge is a fun one and it got me using some products I haven't played with much, or at all.
The colors I took from this are Pool Party, Blushing Bride, Calypso Coral and Soft Suede. I have to say I find the coral hard to work with - so I used it as an accent. The perfect stamp set was of course Tea Shoppe, and I paired it with the Itty Bitty Banners set for the sentiment. The layout is this week's Mojo Monday sketch.
The images, colors and theme for the challenge seemed to lend themselves to a vintage style. Everything is sponged with Soft Suede. I used Blushing Bride DP (retired of course), Pool Party card stock embossed with the vintage wallpaper folder, and a stamped background made with the Canvas and Teahouse BG stamps (appropriate, no?). I love the little bouquet of cutout violets accented with the button - I even sponged ink onto the Pool Party baker's twine to age it. Soft Suede taffeta ribbon over a border punch (punch by MS) accents the background.
That's it for this card - I have more crafting to do! Thanks for visiting!
Labels:
color combo challenge,
sketch challenge,
Stampin' Up,
vintage
Saturday, July 7, 2012
Invitation in a Box
Happy Saturday! This week at Our Creative Corner our hostess, Sharon Wheet, is challenging us to make something for a summer party. I thought a bit and considered making some kind of favor in a container - then I saw my stash of altoid tins and decided to try making an invitation in a box. I kept it pretty simple but I think there are fun possibilities with this idea - what do you think?
This is the front - I covered the top and sides with two of the prints from the Patio Party designer papers and then wrapped the edge of the lid with white grosgrain ribbon. I used the colors in the papers for the stamping (Baja Breeze, Summer Starfruit, Raspberry Ripple, Midnight Muse) and the stamp sets Mouthwatering and Inviting.
When you open the box the party details pop out. Sticking with the theme, I made my party an ice cream social. I lined the insides with more designer paper - the surfaces of the box leave lots of space for decoration if you want to add more. You could even add confetti or other fun stuff inside the box.
Here's a side view - to make the invitation pop out I made one of those springy paper things you make in elementary school - you know, take two strips of paper, attach them at right angles at one corner, and fold them over each other, back and forth... I'm probably not explaining that well, but you know what I mean, right?
OK, I think that's it! Now I want to have an ice cream social - or at least some ice cream! I hope you'll imagine your own summer party and make a project for this week's challenge. And you won't want to miss what the rest of the team has created - it's always worth a visit to the OCC blog to check them all out!
When you open the box the party details pop out. Sticking with the theme, I made my party an ice cream social. I lined the insides with more designer paper - the surfaces of the box leave lots of space for decoration if you want to add more. You could even add confetti or other fun stuff inside the box.
Here's a side view - to make the invitation pop out I made one of those springy paper things you make in elementary school - you know, take two strips of paper, attach them at right angles at one corner, and fold them over each other, back and forth... I'm probably not explaining that well, but you know what I mean, right?
OK, I think that's it! Now I want to have an ice cream social - or at least some ice cream! I hope you'll imagine your own summer party and make a project for this week's challenge. And you won't want to miss what the rest of the team has created - it's always worth a visit to the OCC blog to check them all out!
Thursday, July 5, 2012
Freshly Made Style
I was still feeling kind of blah about my OCC card from last week, and I thought the best way to get out of that stamping funk was to play some challenges for fun. The three I chose to combine are Stampin' Royalty's color challenge, the layout from Freshly Made Sketches, and the challenge at SUO Challenges to use a bird.
I looked through my stamps and considered the bird options - in the end I chose a set I haven't pulled out in quite a while, Elements of Style. Um, yeah, I fudged the layout somewhat and probably veered past CAS with this one, but oh well! Things happen that way sometimes...
I hadn't done any out-of-the-box cutting in a long time so I gave it a try with this image. I gave the flowers just some shading with the daffodil marker. The Baja Breeze strip was an experiment in texture: textured card stock, a strip of the ribbon border punch, and an overlay of seam binding. I really like the effect. I used the Fancy Fan embossing folder for the large layer of Very Vanilla, and then added pearls and a sentiment from Happiest Birthday Wishes (retired hostess set) to finish it off.
Sigh, fun time is over and I have to go get some (paying) work done. Boo hoo! I'll see you back here on Saturday morning with the latest fun challenge from the OCC team!
I looked through my stamps and considered the bird options - in the end I chose a set I haven't pulled out in quite a while, Elements of Style. Um, yeah, I fudged the layout somewhat and probably veered past CAS with this one, but oh well! Things happen that way sometimes...
I hadn't done any out-of-the-box cutting in a long time so I gave it a try with this image. I gave the flowers just some shading with the daffodil marker. The Baja Breeze strip was an experiment in texture: textured card stock, a strip of the ribbon border punch, and an overlay of seam binding. I really like the effect. I used the Fancy Fan embossing folder for the large layer of Very Vanilla, and then added pearls and a sentiment from Happiest Birthday Wishes (retired hostess set) to finish it off.
Sigh, fun time is over and I have to go get some (paying) work done. Boo hoo! I'll see you back here on Saturday morning with the latest fun challenge from the OCC team!
Labels:
color combo challenge,
sketch challenge,
Stampin' Up
Saturday, June 30, 2012
It's a cupcake card - really!
Are you looking for the cupcake? Can you find it? While you're looking, let me apologize for disappearing again the past couple weeks. It got really busy with the kids' last days of school and the beginning of the summer routine. I hope I will be able to get back to posting again - I'm taking it day by day right now!
Found the cupcake yet? This card is for the challenge this week at Our Creative Corner. Our hostess is Kristin Tierney - who is leaving us, sniff, sniff! - and she has asked us to use something that would ordinarily be used in baking. I was a little lost on ideas, but one day when I was at the M store I came across these cute cupcake liners by Paula Deen in the dollar bin. I figured there had to be a cute way to use them on a card. The layout comes from the Pals Paper Arts sketch challenge.
The new In Colors Raspberry Ripple and Primrose Petals, along with Always Artichoke, were really good matches for the colors in the cupcake liners. The flower was die cut from the bottom, and the largest circle is actually made of multiple liners. I cut off the outside border, flattened it, then added a couple more pieces to complete the circle. It ended up being so big that I made a 5x7 card. I wanted a big sentiment for the main circle and chose this one from Word Play. I added some of the large pearls and artichoke seam binding ribbon. Then I thought the corners needed a little something so I pulled out a MS punch. I'm still kind of... meh. I didn't have a lot of time to pull this together and it wasn't quite what I envisioned. I will have to play in some more challenges in the coming days to make sure I haven't lost my mojo! LOL!
Anyway, thanks for visiting today, and be sure you check out the amazing and delicious-looking creations from the rest of the fabulous OCC team!
Labels:
Our Creative Corner,
sketch challenge,
Stampin' Up
Monday, June 18, 2012
Retired stamps, papers, ribbon for sale
Good Monday morning! I'm making my retired stamps (and a few other items) available here before I put them up on Etsy. Just email me at loririder (at) verizon (dot) net and tell me what you're interested in. I will ship as cheaply as possible - please provide your zip code for shipping calculations. I can only ship within the United States. First to pay gets the goods! Paypal only please.
Note: condition is gently used (may include some staining but no other defects) unless otherwise indicated. NUM = new, unmounted
Wood mounted
Serene Snowflakes $15
Northern Hearts $8
Winter Post $18
Christmas Punch $16
Christmas Postcard (mounted, never used) $10
Christmas Collage $14
Christmas Classics $12
Perfect Presentation $15
Gifts of Christmas NUM $15
Sweet Snowglobe (mounted, never used) $6
Patterned Pines $10
Tree Trimmings $8
Little Boo (NUM) $3
Sweet Centers $15
Starring You $8
Elizabeth $6 (mounted, never used)
House of Haunts $10
Thankful Thinking NUM $5
Birthday Bliss $6
Four Square NUM $6
Matchbox Messages $10
Priceless (tiny flower stamp is missing) $10
Crazy for Cupcakes $20
Wedding Sweet $12
Favorite Things NUM $12
Silhouette Sentiments $12
Of the Earth NUM $8
Of the Earth $5
A Flower for All Seasons $8
Eastern Blooms $10
Leaf Lines $12
Apple Blossoms NUM $12
Organic Outlines $7
Wonderful You $7
Autumn Days $16
Punch Potpourri $12
Happiness Shared (mounted, never used) $10
Echoes of Kindness (only one stamp mounted/used) $14
A Little Birthday Cheer (only one stamp mounted/used) $10
Elegant Cheer $17
Absolutely Fabulous (only one stamp mounted/used) $12
Heard from the Heart $15
Afterthoughts $8
Whimsical Words $10
On Your Birthday $20
Punches Three $5
Oval All $12
Holidays & Wishes $12
Curvy Verses $12
Warm Words $16
Lots of Thoughts $10
Think Happy Thoughts $10
Clear mounted
Jolly Old Saint Nick new $15
I Heart Hearts $16
Messages for Mom $15
Hodgepodge Happiness $4
Butterfly Prints $12
Growing Green $15
Plant Hope $16
Funky Four $10
On the Grow $15
Strength & Hope $12
Always Elegant $10
Clearly for You $12
Style Beautiful $15
Notably Ornate $12
Bliss (SAB) $10
Fresh Vintage new $14
Fresh Vintage $12
Elementary Elegance new $10
Elementary Elegance labels mounted but never used $8
Outlined Occasions new $10
Outlined Occasions $8
Sprinkled Expressions new $10
Happy Moments $8
Sweet Summer $7
Happiest Birthday Wishes new $20
Up in the Air $15
Ain't Love Grand labels mounted but never used $10
Simply Soft $14
Paper products (all are new and unopened)
I Wish Simply Scrappin' kit $12
Sunny Day Simply Scrappin' kit $12
Merry Moments DP $6
Chocolate Chip patterns DP $6
Kiwi Kiss patterns DP $6
Delicate Dots DP $4
Ribbon (priced by the yard unless otherwise noted; multiple yards available for most)
Recently retired In Colors (all available except Poppy Parade) $1/yd
Very Vanilla 3/8" velvet $1/yd
Grosgrain 1" stitched in Bashful Blue, Real Red $1/yd
Sleigh Bells (5/8" Real Red/Old Olive/Vanilla twill stripe) $1/yd
Brocade Blue 5/8" grosgrain $.50/yd
In Color 5/8" grosgrain with white stripe: Pacific Point, Riding Hood Red, Tangerine Tango, Kiwi Kiss, Pink Pirouette $.75/yd
In Color 1/2" polka dot grosgrain: Melon Mambo, Soft Suede, Crushed Curry, Dusty Durango, Bermuda Bay $.75/yd
In Color double stitched grosgrain: River Rock, Purely Pomegranate $.50/yd
Black corduroy 3/8" 5 yds available $.75/yd
Chocolate Chip 1/2" satin with white polka dots 3 yds available $1/yd
Certainly Celery 5/8" polytwill $.50/yd
Black lace 1/2" $.50/yd
Mellow Moss 3/8" taffeta $.50/yd
1/4" grosgrain in Night of Navy, Whisper White, Very Vanilla, Pumpkin Pie, Chocolate Chip, Marina Mist, Bravo Burgundy, Apricot Appeal, Tempting Turquoise, Early Espresso, More Mustard, Real Red, Pretty in Pink, Sage Shadow $.50/yd
Beachfront Ribbon Originals $8
New ribbon bundle: So Saffron 5/8" grosgrain, Certainly Celery 5/8" polytwill $6
Note: condition is gently used (may include some staining but no other defects) unless otherwise indicated. NUM = new, unmounted
Wood mounted
Serene Snowflakes $15
Northern Hearts $8
Winter Post $18
Christmas Punch $16
Christmas Postcard (mounted, never used) $10
Christmas Collage $14
Christmas Classics $12
Perfect Presentation $15
Gifts of Christmas NUM $15
Sweet Snowglobe (mounted, never used) $6
Patterned Pines $10
Tree Trimmings $8
Little Boo (NUM) $3
Sweet Centers $15
Starring You $8
Elizabeth $6 (mounted, never used)
House of Haunts $10
Thankful Thinking NUM $5
Birthday Bliss $6
Four Square NUM $6
Matchbox Messages $10
Priceless (tiny flower stamp is missing) $10
Crazy for Cupcakes $20
Wedding Sweet $12
Favorite Things NUM $12
Silhouette Sentiments $12
Of the Earth NUM $8
Of the Earth $5
A Flower for All Seasons $8
Eastern Blooms $10
Leaf Lines $12
Apple Blossoms NUM $12
Organic Outlines $7
Wonderful You $7
Autumn Days $16
Punch Potpourri $12
Happiness Shared (mounted, never used) $10
Echoes of Kindness (only one stamp mounted/used) $14
A Little Birthday Cheer (only one stamp mounted/used) $10
Elegant Cheer $17
Absolutely Fabulous (only one stamp mounted/used) $12
Heard from the Heart $15
Afterthoughts $8
Whimsical Words $10
On Your Birthday $20
Punches Three $5
Oval All $12
Holidays & Wishes $12
Curvy Verses $12
Warm Words $16
Lots of Thoughts $10
Think Happy Thoughts $10
Clear mounted
Jolly Old Saint Nick new $15
I Heart Hearts $16
Messages for Mom $15
Hodgepodge Happiness $4
Butterfly Prints $12
Growing Green $15
Plant Hope $16
Funky Four $10
On the Grow $15
Strength & Hope $12
Always Elegant $10
Clearly for You $12
Style Beautiful $15
Notably Ornate $12
Bliss (SAB) $10
Fresh Vintage new $14
Fresh Vintage $12
Elementary Elegance new $10
Elementary Elegance labels mounted but never used $8
Outlined Occasions new $10
Outlined Occasions $8
Sprinkled Expressions new $10
Happy Moments $8
Sweet Summer $7
Happiest Birthday Wishes new $20
Up in the Air $15
Ain't Love Grand labels mounted but never used $10
Simply Soft $14
Paper products (all are new and unopened)
I Wish Simply Scrappin' kit $12
Sunny Day Simply Scrappin' kit $12
Merry Moments DP $6
Chocolate Chip patterns DP $6
Kiwi Kiss patterns DP $6
Delicate Dots DP $4
Ribbon (priced by the yard unless otherwise noted; multiple yards available for most)
Recently retired In Colors (all available except Poppy Parade) $1/yd
Very Vanilla 3/8" velvet $1/yd
Grosgrain 1" stitched in Bashful Blue, Real Red $1/yd
Sleigh Bells (5/8" Real Red/Old Olive/Vanilla twill stripe) $1/yd
Brocade Blue 5/8" grosgrain $.50/yd
In Color 5/8" grosgrain with white stripe: Pacific Point, Riding Hood Red, Tangerine Tango, Kiwi Kiss, Pink Pirouette $.75/yd
In Color 1/2" polka dot grosgrain: Melon Mambo, Soft Suede, Crushed Curry, Dusty Durango, Bermuda Bay $.75/yd
In Color double stitched grosgrain: River Rock, Purely Pomegranate $.50/yd
Black corduroy 3/8" 5 yds available $.75/yd
Chocolate Chip 1/2" satin with white polka dots 3 yds available $1/yd
Certainly Celery 5/8" polytwill $.50/yd
Black lace 1/2" $.50/yd
Mellow Moss 3/8" taffeta $.50/yd
1/4" grosgrain in Night of Navy, Whisper White, Very Vanilla, Pumpkin Pie, Chocolate Chip, Marina Mist, Bravo Burgundy, Apricot Appeal, Tempting Turquoise, Early Espresso, More Mustard, Real Red, Pretty in Pink, Sage Shadow $.50/yd
Beachfront Ribbon Originals $8
New ribbon bundle: So Saffron 5/8" grosgrain, Certainly Celery 5/8" polytwill $6
Saturday, June 16, 2012
Burlap Butterfly
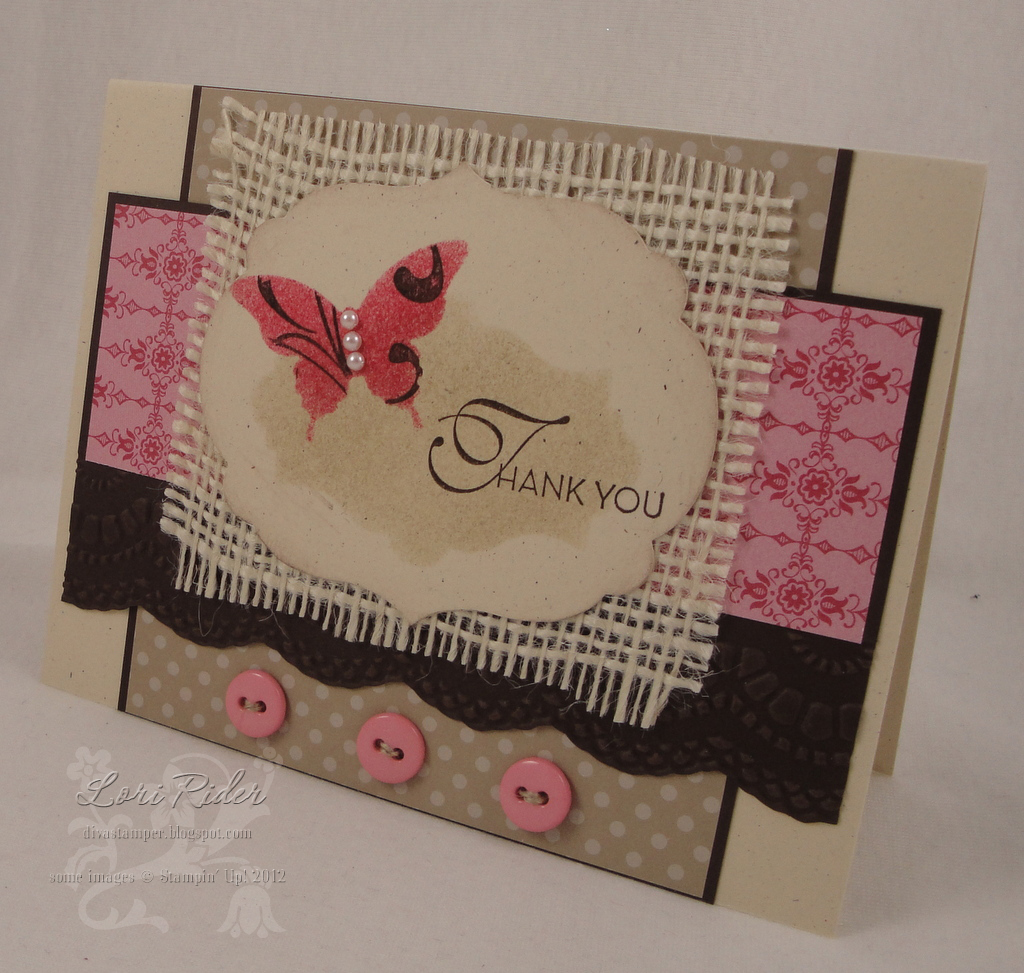
It's been a very long time since I was able to participate in the weekly challenges for Our Creative Corner. The ladies over there have been so understanding with my needing to take a little break. I'm planning to be back as an active part of the team for the rest of this year - yay! This week's challenge is to use buttons and burlap. I can't say I ever thought about using burlap on a card, or even where to get burlap, LOL. But the local fabric store had several colors and I decided to use it on one of the cards my club will make this weekend. The layout comes from the Deconstructed Sketch blog.
Note: there are a whole lotta new products making their debut here! I wanted to feature a technique with this card and chose reverse masking. First I took one of the Apothecary Accents dies, cut out a shape with it, and sponged Crumb Cake ink inside the frame left over onto naturals ivory card stock. Next I punched out the Elegant Butterfly from a post-it note and sponged Primrose Petals (another new In Color) the same way. Before removing the mask I stamped the swirl from Everything Eleanor inside the butterfly with Early Espresso. The sentiment comes from the stamp set Lacy & Lovely. Once I was done stamping, I cut the image out with a labels framelit and sponged espresso ink on the edges. (Probably should have similarly sponged everything else but I forgot - oh well!) Three pearls form the butterfly's body. To finish the card, I cut a piece of burlap slightly larger than my die-cut shape and glued the two onto a panel of Primrose Petals DP and espresso CS embossed with one of the Delicate Designs embossing folders. I put a panel of Crumb Cake DP onto the naturals ivory card base, then added three buttons out of my stash, threaded with linen thread.
I hope you will take on our challenge and play with some burlap this week. Don't forget to stop by the OCC blog and see what the rest of the team has created this week! I'm really happy to be back and looking forward to many more fun challenges with all those lovely OCC ladies. Have a great weekend!
Note: there are a whole lotta new products making their debut here! I wanted to feature a technique with this card and chose reverse masking. First I took one of the Apothecary Accents dies, cut out a shape with it, and sponged Crumb Cake ink inside the frame left over onto naturals ivory card stock. Next I punched out the Elegant Butterfly from a post-it note and sponged Primrose Petals (another new In Color) the same way. Before removing the mask I stamped the swirl from Everything Eleanor inside the butterfly with Early Espresso. The sentiment comes from the stamp set Lacy & Lovely. Once I was done stamping, I cut the image out with a labels framelit and sponged espresso ink on the edges. (Probably should have similarly sponged everything else but I forgot - oh well!) Three pearls form the butterfly's body. To finish the card, I cut a piece of burlap slightly larger than my die-cut shape and glued the two onto a panel of Primrose Petals DP and espresso CS embossed with one of the Delicate Designs embossing folders. I put a panel of Crumb Cake DP onto the naturals ivory card base, then added three buttons out of my stash, threaded with linen thread.
I hope you will take on our challenge and play with some burlap this week. Don't forget to stop by the OCC blog and see what the rest of the team has created this week! I'm really happy to be back and looking forward to many more fun challenges with all those lovely OCC ladies. Have a great weekend!
Friday, June 15, 2012
Father's Day Chevron
Here's a card we'll be making at my club this weekend. We always do a Father's Day card in June, and I know my hubby will be getting this one!
The whole card started with the sentiment treatment (stamp from Delightful Dozen), which was inspired by this card I found on Pinterest. Then I chose a paper from International Bazaar and pulled out Midnight Muse and Cajun Craze from it. (Technically I think the color in this paper is actually Rich Razzleberry, but honestly, it doesn't look like it at all to me!)
Of course I had to use some new stuff, which includes the chevron embossing folder and the scallop piercing guide in our amazing new Essentials Paper-Piercing Pack. These scallops are on the Tasteful Trim die and they match up perfectly for piercing. I embellished with silver brads and Midnight Muse ribbon - hope I didn't girl it up too much. These colors are right up Todd's alley so I think he will like it. Hope you and my club members do too!
The whole card started with the sentiment treatment (stamp from Delightful Dozen), which was inspired by this card I found on Pinterest. Then I chose a paper from International Bazaar and pulled out Midnight Muse and Cajun Craze from it. (Technically I think the color in this paper is actually Rich Razzleberry, but honestly, it doesn't look like it at all to me!)
Of course I had to use some new stuff, which includes the chevron embossing folder and the scallop piercing guide in our amazing new Essentials Paper-Piercing Pack. These scallops are on the Tasteful Trim die and they match up perfectly for piercing. I embellished with silver brads and Midnight Muse ribbon - hope I didn't girl it up too much. These colors are right up Todd's alley so I think he will like it. Hope you and my club members do too!
Thursday, June 14, 2012
Thinking of You - a Bunch!
I'm back with another card for this weekend's birthday party. This one also qualifies for the challenge at Stampin' Royalty this week - Clean and Simple. You know I love it! Here's my card:
I pulled out another of the new In Colors: Raspberry Ripple. Let me just say, this color is gorgeous. Like the child of Rose Red and Purely Pomegranate. I can see myself using this one a lot! I put it with Lucky Limeade and Daffodil Delight. The flower is from Mixed Bunch, with the branch from Betsy's Blossoms and a sentiment from Teeny Tiny Wishes. I put some piercing in the corners and added the brad just to pull a little bit of yellow to the right side for balance. The DPs are from Summer Smooches, the new polka dot pack, and the In Color pack.
That's it for today but I definitely WILL be back in the OCC challenges this weekend and also hope to have more to show you besides that before the week is out. Thanks for visiting!
I pulled out another of the new In Colors: Raspberry Ripple. Let me just say, this color is gorgeous. Like the child of Rose Red and Purely Pomegranate. I can see myself using this one a lot! I put it with Lucky Limeade and Daffodil Delight. The flower is from Mixed Bunch, with the branch from Betsy's Blossoms and a sentiment from Teeny Tiny Wishes. I put some piercing in the corners and added the brad just to pull a little bit of yellow to the right side for balance. The DPs are from Summer Smooches, the new polka dot pack, and the In Color pack.
That's it for today but I definitely WILL be back in the OCC challenges this weekend and also hope to have more to show you besides that before the week is out. Thanks for visiting!
Wednesday, June 13, 2012
Fabulous Island Florets
This weekend I have two stamping events: my monthly club wraps up this session on Friday night, and Saturday morning I'm doing an adult birthday party, which I'm sure will be really fun. This is one of the cards we'll be making. It's a CASE of this card by Sandy Mathis.
I chose to use only two colors (unusual for me) - Old Olive and Island Indigo. I started out by doing some generation stamping with the leaf image, then I stamped the indigo flowers and cut them out. The background uses two indigo papers (the top one from Twitterpated, the bottom from Summer Smooches). The finishing touches were indigo ribbon and a punched sentiment from Petite Pairs. The goal was a pretty easy card that still looks fabulous, so I hope this fits the bill!
Labels:
clean and simple,
clubs and classes,
Stampin' Up
Friday, June 8, 2012
Twice in one day!
Guess I'm on a roll today. It's fun getting back to stamping! This is the second card for my neighbor. She wanted a birthday card for her sister incorporating two things: elephants and light blue. I hope this one will do the trick! I used a sketch challenge for this card as well - Stampin' Royalty has a fun one this week. Here's my card!
I'm all about my new stampin' stuff right now and this card includes several brand-new things. Along with Bashful Blue I chose two of the new In Colors: Midnight Muse and Gumball Green. These colors are really fun and I think I'm going to enjoy them a lot! The elephants (it was the only stamp I had to choose from) are the retired stamp Baby Steps, but the balloons are still available in the Patterned Party set. I've had this set since last year and this was its first time out of the box! I used some retired Bashful Blue DP and also a new green paper that's in the Christmas DP called Be of Good Cheer. I just love the little banner, made with the Itty Bitty Banners stamp set and matching die. It's too cute. I did use a border punch from MS and my nesties for the circle.
All right, this is going to be it for today - and I might not make it back to my stamps over the weekend - but I'm having too much fun to take another three months off. I promise to be back again soon!
I'm all about my new stampin' stuff right now and this card includes several brand-new things. Along with Bashful Blue I chose two of the new In Colors: Midnight Muse and Gumball Green. These colors are really fun and I think I'm going to enjoy them a lot! The elephants (it was the only stamp I had to choose from) are the retired stamp Baby Steps, but the balloons are still available in the Patterned Party set. I've had this set since last year and this was its first time out of the box! I used some retired Bashful Blue DP and also a new green paper that's in the Christmas DP called Be of Good Cheer. I just love the little banner, made with the Itty Bitty Banners stamp set and matching die. It's too cute. I did use a border punch from MS and my nesties for the circle.
All right, this is going to be it for today - and I might not make it back to my stamps over the weekend - but I'm having too much fun to take another three months off. I promise to be back again soon!
I don't even know where to begin!
Wow, I never would have thought I would go for almost 3 months without posting on my blog. I hope that it doesn't happen again! Lots has been going on that had little to do with stamping... I'm still doing TMJ treatments and I'm feeling better but still not singing. So - hanging in there and hoping for the best. The kids are almost done with school and then they'll only have a couple days off before heading into summer camp - I'm sure the months will continue to fly by. I've been editing up a storm - got in a little over my head and now I'm ready for a break. I've also started making jewelry, which has been really fun. I knew it was a slippery slope and I think that's why I avoided learning how to do it for so long... but it's too late now! LOL!
Anyway - back to stamping. I haven't forgotten about my stamps but they've definitely taken a back seat for the past while. I'm realizing that I really want to get back into doing challenges (including the OCC, but probably not this weekend) and posting here. I've also signed up for a craft fair in September so I'll need to be making some cards to sell, right?
I got a little boost this week when a very nice neighbor requested four cards for specific people and occasions. I thought I would share the first one - especially since it uses some goodies from the brand-new catalog that just started last week! The request was a for a sympathy card using rust, with an earthy look. This is what I came up with - hope she likes it. The layout comes from a sketch blog I don't think I've played along with before: Freshly Made Sketches.
The new image I've featured here is from the stamp set Serene Silhouettes. I used Cajun Craze for the main color with accents of Early Espresso, on the naturals ivory card stock. The sentiment comes from the set Love & Sympathy (not new, but the first time I've used it). In the background I added a panel embossed with the new fancy fan folder, and although I tried a million border punches for the espresso piece, nothing looked right and in the end I thought tearing would give me that earthy feel I was going for. I sponged all the edges and then added espresso taffeta ribbon and three little pearls for embellishments.
So, now that I've broken the ice, I'm really going to try to post more often. I'm looking forward to getting back into the groove. Thanks for visiting, have a great weekend, and hope to see you again soon!
Anyway - back to stamping. I haven't forgotten about my stamps but they've definitely taken a back seat for the past while. I'm realizing that I really want to get back into doing challenges (including the OCC, but probably not this weekend) and posting here. I've also signed up for a craft fair in September so I'll need to be making some cards to sell, right?
I got a little boost this week when a very nice neighbor requested four cards for specific people and occasions. I thought I would share the first one - especially since it uses some goodies from the brand-new catalog that just started last week! The request was a for a sympathy card using rust, with an earthy look. This is what I came up with - hope she likes it. The layout comes from a sketch blog I don't think I've played along with before: Freshly Made Sketches.

The new image I've featured here is from the stamp set Serene Silhouettes. I used Cajun Craze for the main color with accents of Early Espresso, on the naturals ivory card stock. The sentiment comes from the set Love & Sympathy (not new, but the first time I've used it). In the background I added a panel embossed with the new fancy fan folder, and although I tried a million border punches for the espresso piece, nothing looked right and in the end I thought tearing would give me that earthy feel I was going for. I sponged all the edges and then added espresso taffeta ribbon and three little pearls for embellishments.
So, now that I've broken the ice, I'm really going to try to post more often. I'm looking forward to getting back into the groove. Thanks for visiting, have a great weekend, and hope to see you again soon!
Labels:
clean and simple,
sketch challenge,
Stampin' Up,
sympathy
Thursday, March 15, 2012
Helloooooo....
Is anyone still out there? Yes, it's me, your long-lost Diva Stamper!
Oh my gosh... I hate that it's been so long since I've posted. I'm still just really busy and I hadn't touched my stamps in weeks. But this weekend I have club so I thought I would try to get my projects posted for you this month. Here is a clean and simple card that we're going to make featuring the Button Bits stamp set. This is a CASE from the fabulous Carrie Gaskin.
My card is much simpler than Carrie's - I love hers the mostest but I thought I should step it down a tad. I kept the Soft Suede and Blushing Bride that she used, but I stuck with Pear Pizzazz for the third color (plus vanilla card stock for stamping). My vase is cut out and popped up with dimensionals, and I used the same cute buttons from the mini catalog but put the silver mini brads in the center instead of rhinestones. Did you know you can do this? Just press down on both sides with a bone folder to make sure the brad is flat, and be careful that it stays centered between the holes. If the prongs stick out the sides on the back of the button, just trim them with your rubber scissors.
I love Carrie's trick for using the decorative label punch for the main image. I figured out that to fit in the long side of the punch, the card stock should be 1 3/4" wide and it lines up perfectly. I also used the same punch to detail my card corners (I did this once before here). Instead of DP I added a row of stamping with the border stamp from the SAB set Fresh Vintage, and with a sentiment from Well Penned I'm calling this one done!
I have to dash off to my TMJ appointment for the day. I would love to come back and show you the other two projects we'll be making this weekend, so I'm crossing my fingers that I can find a few minutes to post those soon! Thanks for stopping by!
Oh my gosh... I hate that it's been so long since I've posted. I'm still just really busy and I hadn't touched my stamps in weeks. But this weekend I have club so I thought I would try to get my projects posted for you this month. Here is a clean and simple card that we're going to make featuring the Button Bits stamp set. This is a CASE from the fabulous Carrie Gaskin.
My card is much simpler than Carrie's - I love hers the mostest but I thought I should step it down a tad. I kept the Soft Suede and Blushing Bride that she used, but I stuck with Pear Pizzazz for the third color (plus vanilla card stock for stamping). My vase is cut out and popped up with dimensionals, and I used the same cute buttons from the mini catalog but put the silver mini brads in the center instead of rhinestones. Did you know you can do this? Just press down on both sides with a bone folder to make sure the brad is flat, and be careful that it stays centered between the holes. If the prongs stick out the sides on the back of the button, just trim them with your rubber scissors.
I love Carrie's trick for using the decorative label punch for the main image. I figured out that to fit in the long side of the punch, the card stock should be 1 3/4" wide and it lines up perfectly. I also used the same punch to detail my card corners (I did this once before here). Instead of DP I added a row of stamping with the border stamp from the SAB set Fresh Vintage, and with a sentiment from Well Penned I'm calling this one done!
I have to dash off to my TMJ appointment for the day. I would love to come back and show you the other two projects we'll be making this weekend, so I'm crossing my fingers that I can find a few minutes to post those soon! Thanks for stopping by!
Labels:
clean and simple,
clubs and classes,
Stampin' Up
Saturday, February 4, 2012
I Heart Embossing
Saturday again? Wow! Guess it's time for this week's challenge at Our Creative Corner! Our hostess this week is Sharon Wheet, and she has a recipe challenge: make a Valentine's Day card or project that includes a heart, something that sparkles or shines, and the colors pink, kraft and gray. I decided to do a clean and simple project this week - not that CAS means it necessarily took me any less time! LOL! It took me a few false starts to get to my final design, which I quite like after all is said and done...
Before I go I want to say thanks to everyone out there who's reading - I wish I could post more often, but right now I'm pursuing new treatment for my TMJ issues, which involves PT at least twice a week and occasional trips into Boston, and I'm also trying to pick up additional freelance work. So the chances I will get to do much stamping are slim these days. Boo hoo! I do appreciate all my readers, followers and subscribers, and thanks for sticking with me!
For my colors I picked Crumb Cake and Basic Gray (of course) and my pinks are Melon Mambo and Pink Pirouette. I pulled out several of the mini catalog products for Valentine's Day on this one. The main image and the banner behind it come from the set called Take It to Heart, and the sentiment is from P.S. I Love You. The big heart was cut with the heart Framelits. Those cute little hearts are made with the heart embosslit, and I used one of the new embossing folders to make the row of hearts on the card base. As if that wasn't enough embossing, I put the image onto a "fabric" panel of gray cardstock embossed with the houndstooth folder. (When it was all put together I sort of wished I'd used DP instead, but this is what I'm going with!) Finally I just needed some bling, and the rhinestones did the trick.
Now I'm in a Valentine's mood - how about you? I hope you will want to get out your supplies and play along with this challenge. We wouldn't exist without all the fabulous stampers who participate with us each week! And a big welcome to our wonderful new DT members, who are posting with us for the first time this Saturday. Please stop by the OCC blog to show some love to our fabulous team!
Before I go I want to say thanks to everyone out there who's reading - I wish I could post more often, but right now I'm pursuing new treatment for my TMJ issues, which involves PT at least twice a week and occasional trips into Boston, and I'm also trying to pick up additional freelance work. So the chances I will get to do much stamping are slim these days. Boo hoo! I do appreciate all my readers, followers and subscribers, and thanks for sticking with me!
Saturday, January 28, 2012
Apothecary Elements
Welcome to my second week of hosting the challenges at Our Creative Corner! This week I have a sketch for you. I came up with this sketch a long time ago based on the label of a box of bakery muffins from Walmart. See, you never know where you might find inspiration!
I combined my card with two other challenges: SU Only (use your favorite product from the Occasions mini) and the Color Throwdown (Pool Party, Crumb Cake, Chocolate Chip, Rose Red).
I actually have several Occasions mini favorite products on this card: the stamp sets Apothecary Art and Creative Elements; the Framelits dies; and the large pearls. I stamped all over the Crumb Cake DP with the swirly stamp from Creative Elements and also used the label image from that stamp set. For the Pool Party DP die-cut label, I inked just the outline of the journaling stamp with a marker, then using the Stamp-a-ma-jig, I added the flowers on the top and bottom of the label. The circles on the sketch became my medallions, which I made with the triple doily punch, the bitty flower punch, and the aforementioned pearls. FYI, the size of the background scalloped square is 5 3/16".
I've had fun hosting these two challenges, and I hope you have fun playing along with this sketch! Have a wonderful weekend!
Saturday, January 21, 2012
Birthday Beauty
Wow, another Saturday - that means another challenge at Our Creative Corner! I get the privilege of being the hostess for the next two weeks, and this week I have my favorite: an inspiration challenge. I found this gorgeous baby shower table at the Hostess with the Mostess blog. The challenge is to find at least two elements in the photo to inspire your project, and as a bonus you can give it a baby theme if you wish.
This card is doing double duty as a stamp club project, so I elected not to make it a baby card. The background technique is called faux tile, which I was inspired to teach my club after seeing this card. I didn't end up CASEing Lynn's gorgeous card but instead went a different direction so I could showcase some new products from the Occasions mini.
This is a 5 1/4" square card. The main image comes from the fabulous stamp set Apothecary Art and the new Framelits labels. I took my colors from the inspiration photo: Pool Party, Calypso Coral, Pear Pizazz, and Early Espresso. I thought the flowers in the image echoed the floral elements on the shower table. For accents I chose coral ribbon (which is also on the table in the photo) and a larger label of pear DP. To give the green just a little definition against the blue background, I edged the DP with espresso marker. The tile background is a 5" square of Pool Party card stock, scored into 1 1/4" squares, stamped with the SAB set Fresh Vintage, and sponged across the score lines for definition. Finally I incorporated the rhinestones that appear in the background of the photo as center accents for the flowers.
OK, that's it from me - I hope you enjoy this challenge and come play along with us! Be sure you check out what the rest of the team has created as well, and have a wonderful weekend!
Friday, January 20, 2012
Birdhouse Birthday
My new stamp club is starting up this weekend, which means I get to stamp more than once this week! LOL! I always like to have my stampers play with new stuff, and this card fits the bill. It's a CASE of this card by Mary Fish, which I just loved and thought could easily work for any occasion. I'm also entering this card in the paper piercing challenge at the Friday Mashup.
The colors I chose are Riding Hood Red, Baja Breeze and Chocolate Chip. The main image is from the hostess set Up in the Air, which is in the Occasions mini. Also in the Occasions mini is the pleated ribbon - this stuff is gorgeous - as well as the Edgelit die which created the scallop border. I used the Christmas stamp from Perfect Punches but covered the sentiment with one from Up, Up & Away. The embossed polka dots and paper piercing finish off this fun card.
I'll be back tomorrow with my OCC card for this week! Thanks for stopping by!
Saturday, January 14, 2012
Baby Birthday Cake
It's the weekend again - time for another challenge at Our Creative Corner! Our hostess again this week is Vicki Burdick, and this time around she wants us to use paper piecing. So here is my card - the papers are supposedly baby themed but I thought they would be really cute for a birthday. The challenge requirements also state: NO ribbon and ONE embellishment. I interpreted that to be one TYPE of embellishment, so I hope I didn't break the rules...
This card uses some non-SU product (stamp by Savvy Stamps, DP by Simple Stories - Baby Cakes, border die by PTI). The 2 1/2" circle punch and pennant die provide my cut-out shapes, and I added some sparkle with my glitter pen. The embellishment(s): retired pink buttons tied with linen thread. The sentiment is from Bring on the Cake, and to pretty up the end of my banner I stuck it into the decorative label punch to get a funky edge.
Be sure you check out all the creations by our team members for this week's challenge, and while you're at the OCC blog, submit your favorite recent creation for our design team call! We are looking for some new talent to join us and it could be you!
Saturday, January 7, 2012
Happy new year!
Oh my gosh - such a long time since I've blogged and stamped. I'm happy to say that I'm back from my break with the fabulous team at Our Creative Corner. When it came time to make my card for this week's challenge, I felt quite out of prractice. Vicki Burdick has challenged us to make a shape card, and after a little hunting online I decided to make this matryoshka (Russian doll) card. The template is printable - plus there are lots more to choose from so you can play along with us! Since this is a birthday card I'm also entering it in the Friday Mashup birthday challenge.
I decided to feature the gorgeous stamp set that's part of the Sale-a-Bration offerings called Fresh Vintage and the matching DP, Everyday Enchantment. I love these two products so, so much. The colors I used all come from the DP: Pool Party, Poppy Parade, Very Vanilla and Soft Suede. Mostly I got my shapes from the template, but I did use some Big Shot/punched circles (cupcake punch, owl punch, circles #2 die). The border at the bottom uses one of the edge dies that's available in the Occasions mini. I stamped the flower then used leaves cut from the DP and placed the whole thing onto the embossed oval frame with a sentiment from Easy Events. (The flower in her hair is also cut from the DP - this card required a lot of cutting and glueing!)
I had fun with this - it's a great challenge to try something you've never done before. I know someone with a large collection of these dolls so I should save this one for her birthday! Please join in the fun with us and try out the challenge - I don't think you'll regret it. And be sure you see the rest of the wonderful shape creations from the design team!
Labels:
Big Shot,
Our Creative Corner,
punch art,
Stampin' Up
Wednesday, December 14, 2011
If you haven't noticed...
I'm taking a little break from blogging. The busy-ness of life was getting away from me, so with preparing for the holidays I decided I needed a little time off. I plan to be back posting in January. I hope everyone has a blessed holiday season and a happy new year! See you in 2012!
Saturday, November 26, 2011
O Christmas tree...
I hope everyone had a lovely Thanksgiving - and we're moving on to Christmas with this week's challenge at Our Creative Corner! Our hostess this week is Wendy Janson and she has challenged us to make a card with a Christmas tree. My card for today is another one for my Christmas card buffet - it's a CASE of this card, which I thought was really cute. The card buffet stampers loved it too, so thanks to Debra Currier for the inspiration!
I wanted to introduce my stampers to the pennant punch and stamp set, and what better way than through an adorable Christmas card. It's a quite simple card - the cute snowflake embossing folder, Cherry Cobbler, Lucky Limeade and Soft Suede card stock (plus naturals white for stamping), DP from the Simply Scrappin' kit in the holiday mini, and the tree image with a sentiment from Perfect Pairs. If you are wondering what I used to make my scalloped "circle" it's actually two of the big flower on the Island Floral die, overlaid to make a circle. I like to get creative with my tools for card buffets so I don't have to use anything on more than one card, so this was my way of using a die I wouldn't have otherwise used at Christmas.
That's it for me this week - I still have more card buffet cards to show you and I hope I get time to do just that in the coming week! I hope you'll join in and make a Christmas tree card with us this week and be sure you take a peek at what the rest of the designers on our team came up with. I'm sure it will put you in the holiday spirit!
I wanted to introduce my stampers to the pennant punch and stamp set, and what better way than through an adorable Christmas card. It's a quite simple card - the cute snowflake embossing folder, Cherry Cobbler, Lucky Limeade and Soft Suede card stock (plus naturals white for stamping), DP from the Simply Scrappin' kit in the holiday mini, and the tree image with a sentiment from Perfect Pairs. If you are wondering what I used to make my scalloped "circle" it's actually two of the big flower on the Island Floral die, overlaid to make a circle. I like to get creative with my tools for card buffets so I don't have to use anything on more than one card, so this was my way of using a die I wouldn't have otherwise used at Christmas.
That's it for me this week - I still have more card buffet cards to show you and I hope I get time to do just that in the coming week! I hope you'll join in and make a Christmas tree card with us this week and be sure you take a peek at what the rest of the designers on our team came up with. I'm sure it will put you in the holiday spirit!
Saturday, November 19, 2011
Gold and Blue Christmas
I'm back as promised with another card for my Christmas card buffet. This one is for the challenge this weekend at Our Creative Corner, which is an inspiration challenge:
I started by cutting out the lattice (twice) with the Big Shot - it's tone-on-tone Very Vanilla. It takes two lattice cutouts to cover the card base, but you only need the end of one of them. I wrapped gold cord (retired, shh) around the panel and then put my bird in the center. You may not be able to tell but I used the Bright Hopes stamp set for the gold embossing. The tree image is large enough that you can stamp and emboss and then punch out the elements from the black and Pacific Point card stock. I used three of the branches and then added the gold berries. I made these by taking the Versamark pad straight to the vanilla card stock, embossing the whole thing gold, and punching them out with the dots on the cupcake punch - you can also use gold card stock. The sentiment is from Teeny Tiny Wishes and is punched with the word window and modern label punches. That's it! I like the clean design, and I didn't want to add anything else because it does take some time to assemble all the punched pieces.
I'm going to get back to work churning out those card designs - thanks for stopping by today, and don't forget to visit the OCC blog to see the inspired creations from the rest of our wonderful team!
The elements I chose to incorporate from this picture are the patterned tablecloth, the cream background, the golden bird on the table, and the pops of blue and black. This is what I came up with:
I started by cutting out the lattice (twice) with the Big Shot - it's tone-on-tone Very Vanilla. It takes two lattice cutouts to cover the card base, but you only need the end of one of them. I wrapped gold cord (retired, shh) around the panel and then put my bird in the center. You may not be able to tell but I used the Bright Hopes stamp set for the gold embossing. The tree image is large enough that you can stamp and emboss and then punch out the elements from the black and Pacific Point card stock. I used three of the branches and then added the gold berries. I made these by taking the Versamark pad straight to the vanilla card stock, embossing the whole thing gold, and punching them out with the dots on the cupcake punch - you can also use gold card stock. The sentiment is from Teeny Tiny Wishes and is punched with the word window and modern label punches. That's it! I like the clean design, and I didn't want to add anything else because it does take some time to assemble all the punched pieces.
I'm going to get back to work churning out those card designs - thanks for stopping by today, and don't forget to visit the OCC blog to see the inspired creations from the rest of our wonderful team!
Labels:
Christmas,
clean and simple,
Our Creative Corner,
Stampin' Up
Wednesday, November 16, 2011
It's that time of year...
Christmas card buffet time! I am actually doing the buffet twice this year, but with the same 10 cards, and *blush* I'm going to be CASEing a lot. Here's the first one, which is a CASE but one that I played around with some. The original card was shown at the Louisville regional and posted by Linda Heller (among others I'm sure). Here is my version, using the Paper Players color challenge of Always Artichoke, River Rock and Riding Hood Red:
I love that we now have a tool for making easy scored backgrounds! I used 1/2" score lines and sponged the River Rock panel with artichoke ink. Actually I sponged everything, LOL. Once you start it's hard to stop! The image from Bells & Boughs was colored with blender pen and reinkers so I could shade a little bit. I used one of the circles from the Pennant die for the layer behind my image. The rest of the card is pretty simple: a sentiment from Four the Holidays, vanilla and artichoke layers, RHR card base, three gold brads, and some artichoke seam binding.
I promise to show you another card buffet offering with my OCC challenge on Saturday. I can't guarantee I will make it back this week to post any of the others, but I will try! Thanks for visiting!
I love that we now have a tool for making easy scored backgrounds! I used 1/2" score lines and sponged the River Rock panel with artichoke ink. Actually I sponged everything, LOL. Once you start it's hard to stop! The image from Bells & Boughs was colored with blender pen and reinkers so I could shade a little bit. I used one of the circles from the Pennant die for the layer behind my image. The rest of the card is pretty simple: a sentiment from Four the Holidays, vanilla and artichoke layers, RHR card base, three gold brads, and some artichoke seam binding.
I promise to show you another card buffet offering with my OCC challenge on Saturday. I can't guarantee I will make it back this week to post any of the others, but I will try! Thanks for visiting!
Tuesday, November 15, 2011
Real Basic Pumpkin Pie
No, this isn't a cooking blog - you are in the right place! For the challenge this week at Our Creative Corner our hostess Wendy Janson asked us to feature pumpkins or the color Pumpkin Pie. I pulled out my Color Coach and found this cool combo of Pumpkin Pie, Real Red and Basic Gray. I tried to make the PP the main color, I really did, but I don't think it quite comes across that way. Oops! I should have known that the red would want to jump out, but I didn't have time to switch any elements around. The fun layout comes from the Mojo Monday sketch for this week.
I decided to put my sentiment in the rectangle spot and chose a large one that could pull that off. It's from the hostess set Happiest Birthday Wishes. I colored it with markers then added a rhinestone (colored with a Sharpie) for the dot on the I. The designer paper is Real Red and retired Pumpkin Pie. My flower is 8 layers if you count the rhinestone - I used the Blossom Party die and another flower die that was in a mini and I'm blanking on the name of it... sorry! The plain white background features the Elegant Bouquet embossing folder, and to anchor the bottom of the card I added three (retired) PP buttons with more colored rhinestones glued to the centers.
Mmm, now I'm thinking about pumpkin pie. Thanksgiving is not far off! I hope you'll get in on our early celebration and pull out your pumpkins this week! Be sure you also visit the OCC blog to see what the rest of the team came up with!
I decided to put my sentiment in the rectangle spot and chose a large one that could pull that off. It's from the hostess set Happiest Birthday Wishes. I colored it with markers then added a rhinestone (colored with a Sharpie) for the dot on the I. The designer paper is Real Red and retired Pumpkin Pie. My flower is 8 layers if you count the rhinestone - I used the Blossom Party die and another flower die that was in a mini and I'm blanking on the name of it... sorry! The plain white background features the Elegant Bouquet embossing folder, and to anchor the bottom of the card I added three (retired) PP buttons with more colored rhinestones glued to the centers.
Mmm, now I'm thinking about pumpkin pie. Thanksgiving is not far off! I hope you'll get in on our early celebration and pull out your pumpkins this week! Be sure you also visit the OCC blog to see what the rest of the team came up with!
Saturday, November 5, 2011
Is Razzleberry manly?
Not a question I ever thought I might ask, but there you go! This week for the challenge at Our Creative Corner, our hostess Tui Nathan asked us to make a masculine card - and if we were up to the challenge, to make a masculine card using nonmasculine colors. I wanted to give it an honest try, even though I admit - it was difficult and I'm not sure I succeeded! Tell me what you think...
Yeah, I don't think this would pass the masculine test in my house. I feel like I've seen other cards tagged as masculine that were more feminine than this, though! Well, this is my card and I'm going with it. I used generation stamping to create the leaf panel with this image from Just Believe. The sentiment is PTI. I made my little tabs for the jumbo brads with the modern label punch, and the designer paper in the background is Early Espresso (stripe) and the razzleberry print from Pocketful of Posies. Add some sponging on the edges and that was that! I do like the card, even if it's not too manly, LOL!
We hope you will take on our challenge - try those nonmasculine colors out and see what you come up with! Be sure you also visit the OCC blog to see the rest of the creations from our team!
Yeah, I don't think this would pass the masculine test in my house. I feel like I've seen other cards tagged as masculine that were more feminine than this, though! Well, this is my card and I'm going with it. I used generation stamping to create the leaf panel with this image from Just Believe. The sentiment is PTI. I made my little tabs for the jumbo brads with the modern label punch, and the designer paper in the background is Early Espresso (stripe) and the razzleberry print from Pocketful of Posies. Add some sponging on the edges and that was that! I do like the card, even if it's not too manly, LOL!
We hope you will take on our challenge - try those nonmasculine colors out and see what you come up with! Be sure you also visit the OCC blog to see the rest of the creations from our team!
Labels:
A Muse,
clean and simple,
Our Creative Corner,
Stampin' Up
Saturday, October 29, 2011
Where to start...
The last two weeks have been so crazy - I don't think I can even go into everything that's been going on. A little travel that included a hotel fire (a very small one, but at 4 a.m. any fire in your hotel is unwelcome)... some sickness for me and my kids... well, let's just say I wasn't doing any stamping. But I'm back this week for the challenge at Our Creative Corner. Our hostess this time around is Tui Nathan, and she is asking us to make a fancy fold card. This is not really my thing, usually - I like them when I'm done, but I don't seek them out to make very often. I hope this one qualifies as fancy enough - with the week I've had I wasn't up for taxing my brain cells too much! LOL!
This card is a trifold pocket card, which is super easy thanks to Beate's great tutorial on SCS. The main part of the card uses a panel of Spice Cake designer paper - can you believe I hadn't cut into this paper yet? That's how busy I have been! I used the double scallop border punch to make all the little scallop borders - just trim the punched piece in half. Also appearing here for the first time - the Triple Treat Flower. I love images that go with punches, especially since you can stamp the same flower and use three different punches with it. So cool! The colors come from the DP: Soft Suede, Pool Party and More Mustard. The largest flower comes from the Island Floral die, and for a little more texture I embossed it with the Finial Press folder. Then I took the sentiment from Teeny Tiny Wishes and stamped it onto the banner that comes with the Petal Cone die.
I'm not usually an inside-the-card kind of stamper, but this one kind of requires it since it includes the panel you pull out of the pocket. I decided not to stamp on it, just leave most of it blank for the message, but I did add the DP to the bottom and the Pool Party/More Mustard ribbon and button to the top.
What's your favorite fancy fold? You can do what I did and check out other tutorials on Splitcoast - there are a bunch. I hope you'll give one and try and share the results with us! And be sure you take a peek at all the cards from our wonderful team this week!
This card is a trifold pocket card, which is super easy thanks to Beate's great tutorial on SCS. The main part of the card uses a panel of Spice Cake designer paper - can you believe I hadn't cut into this paper yet? That's how busy I have been! I used the double scallop border punch to make all the little scallop borders - just trim the punched piece in half. Also appearing here for the first time - the Triple Treat Flower. I love images that go with punches, especially since you can stamp the same flower and use three different punches with it. So cool! The colors come from the DP: Soft Suede, Pool Party and More Mustard. The largest flower comes from the Island Floral die, and for a little more texture I embossed it with the Finial Press folder. Then I took the sentiment from Teeny Tiny Wishes and stamped it onto the banner that comes with the Petal Cone die.
I'm not usually an inside-the-card kind of stamper, but this one kind of requires it since it includes the panel you pull out of the pocket. I decided not to stamp on it, just leave most of it blank for the message, but I did add the DP to the bottom and the Pool Party/More Mustard ribbon and button to the top.
What's your favorite fancy fold? You can do what I did and check out other tutorials on Splitcoast - there are a bunch. I hope you'll give one and try and share the results with us! And be sure you take a peek at all the cards from our wonderful team this week!
Saturday, October 15, 2011
Wisteria for You
Wow, Saturday again already? These weeks are flying by! Our hostess at Our Creative Corner this week is Marjie Kemper, and she is challenging us to use transparencies. I was a little stumped - it's not a product I usually reach for, but I did happen to have a retired SU transparency with black polka dots that I think I put to good use on this card.
I started by cutting out the transparency flower with the Big Shot. I layered it over Whisper White to make the dots pop. The leaves were cut with the Build a Blossom punch from Lucky Limeade cardstock I'd embossed with the lattice folder. The Wisteria Wonder flower center is punched from the lace border punch - the 3/4" circle fits the center of the punch's design perfectly. (I saw this on someone's blog recently but I don't remember who it was!) I brought in more doilies with this wisteria DP from the Flirtatious pack, and I repeated the lattice embossing on the white background panel. Finally the sentiment is from the retired set Great Friend, and under the words I stamped (third generation) the branch from the same set, then added a bitty wisteria flower and a couple rhinestones for a touch of bling. I think it turned out really cute!
I hope you'll play along with our challenge this week - we always have a great time bringing the challenges to you and love to see what you come up with! Have a great weekend!
I started by cutting out the transparency flower with the Big Shot. I layered it over Whisper White to make the dots pop. The leaves were cut with the Build a Blossom punch from Lucky Limeade cardstock I'd embossed with the lattice folder. The Wisteria Wonder flower center is punched from the lace border punch - the 3/4" circle fits the center of the punch's design perfectly. (I saw this on someone's blog recently but I don't remember who it was!) I brought in more doilies with this wisteria DP from the Flirtatious pack, and I repeated the lattice embossing on the white background panel. Finally the sentiment is from the retired set Great Friend, and under the words I stamped (third generation) the branch from the same set, then added a bitty wisteria flower and a couple rhinestones for a touch of bling. I think it turned out really cute!
I hope you'll play along with our challenge this week - we always have a great time bringing the challenges to you and love to see what you come up with! Have a great weekend!
Labels:
clean and simple,
Our Creative Corner,
Stampin' Up
Saturday, October 8, 2011
Simple Soft Birthday
Greetings! I hope your weekend is starting off well - and glad you're starting your Saturday here! This week I'm the hostess for the Our Creative Corner challenge again, and I have a color challenge for you: Pool Party, Chocolate Chip, Old Olive, Cajun Craze, plus a light neutral. I wanted a combination that would make pretty fall cards, but use it for anything that strikes your fancy!
I went through my stamps looking for a set I hadn't used yet, and I picked the hostess set Simply Soft. This is a really pretty two-step set, and I added extra color to the leaves and stamens (is that the right word?) with markers. I added a little border punch to the left, plus some piercing and a sentiment from Perfect Pairs. The ribbon is from my stash but looks just like Cajun Craze, and the DP comes from the Domestic Goddess paper pack. It's a beautiful subtle pattern, which is just what I wanted here. Finally I ran the bottom of the card base through the Big Shot with the polka dot embossing folder and this CAS card was finished!
I can't wait to see what everyone comes up with for these colors, so please join in the challenge and be sure you leave some love for the other DT members with their gorgeous creations!
I went through my stamps looking for a set I hadn't used yet, and I picked the hostess set Simply Soft. This is a really pretty two-step set, and I added extra color to the leaves and stamens (is that the right word?) with markers. I added a little border punch to the left, plus some piercing and a sentiment from Perfect Pairs. The ribbon is from my stash but looks just like Cajun Craze, and the DP comes from the Domestic Goddess paper pack. It's a beautiful subtle pattern, which is just what I wanted here. Finally I ran the bottom of the card base through the Big Shot with the polka dot embossing folder and this CAS card was finished!
I can't wait to see what everyone comes up with for these colors, so please join in the challenge and be sure you leave some love for the other DT members with their gorgeous creations!
Labels:
clean and simple,
Our Creative Corner,
Stampin' Up
Saturday, October 1, 2011
From Korea with Love
Greetings on another Saturday - time for this week's Our Creative Corner challenge. This week the hostess is... me! Since today is World Card Making Day, the challenge I planned is to make a card inspired by a country other than your own. I hope you'll play along!
The country I chose is Korea. Way back in 1993 (wow, almost 20 years ago!) I spent three months living in Taegu (or I believe the spelling "Daegu" is more common now) on an exchange with Yeungnam University. It was a wonderful experience. One of my favorite memories is of the cherry blossoms we got to see all over the city, since we were lucky enough to be there for spring. The university has a special place that everyone calls "Love Road" - it's lined with cherry trees, and if you walk there with your significant other while the trees are blooming, it's supposed to mean you'll get married. I didn't test out that theory, LOL, but I did find it really beautiful. I wanted to share a photo but I can't find my Korea photo album - argh! It's around here somewhere!
Anyway, I decided to make a "love" card with one of my all-time favorite stamps. I can't remember the name of this long-retired hostess set, but I will never part with this stamp. I did a couple other challenges with this card - Freshly Made Sketches (OK, I did fiddle with the sketch significantly...) and the Color Throwdown. The colors this week were Calypso Coral, Poppy Parade, Lucky Limeade and Chocolate Chip. The flower centers are colored with the poppy marker - that's all the poppy that made it onto the card! I just couldn't see a good way to add more. I used the Elegant Lines embossing folder for the background and the heart punch and Embosslit for my shape accent, along with a Chocolate Chip button. The sentiment is from another old set - Many Happy Returns. Oh, and if you're wondering how I did the corners on my tag, I slid them into the decorative label punch to make that little scallop-like detail.
Come over to the OCC blog to see what the rest of the team made - and then put your thinking cap on, get out your atlas, or just raid your stamps and play along with us!
The country I chose is Korea. Way back in 1993 (wow, almost 20 years ago!) I spent three months living in Taegu (or I believe the spelling "Daegu" is more common now) on an exchange with Yeungnam University. It was a wonderful experience. One of my favorite memories is of the cherry blossoms we got to see all over the city, since we were lucky enough to be there for spring. The university has a special place that everyone calls "Love Road" - it's lined with cherry trees, and if you walk there with your significant other while the trees are blooming, it's supposed to mean you'll get married. I didn't test out that theory, LOL, but I did find it really beautiful. I wanted to share a photo but I can't find my Korea photo album - argh! It's around here somewhere!
Come over to the OCC blog to see what the rest of the team made - and then put your thinking cap on, get out your atlas, or just raid your stamps and play along with us!
Subscribe to:
Posts (Atom)